728x90
반응형

label 필드

레이블 필드를 추가해두면 지라 검색 시 관련된 이슈를 편하게 찾을 수 있다.

티켓의 수가 많을 경우, 레이블을 하나씩 손으로 작성해주기는 귀찮기 때문에 파이썬의 JIRA Package를 활용해서 추가해줬다.


from jira import JIRA

class JiraAPI:
    def __init__(self, url:str, auth:set):
        self.options = {'server': url}
        self.jira = JIRA(self.options, basic_auth=auth)
        
    def set_labels(self, issue_ids:str, labels:list):
    	for issue_id in issue_ids:
	    	issue = self.jira.issue(issue_id)
            
    		for label in labels:
        	    issue.update(labels= [ {'add': str(label)} ] )
        
    def delete_labels(self, issue_ids:str, labels:list):
    	for issue_id in issue_ids:
	    	issue = self.jira.issue(issue_id)
            
    		for label in labels:
        	    issue.update(labels= [ {'remove': str(label)} ] )


if __name__ == "__main__":
    jira = JiraAPI(url="https://company.atlassian.net", auth=("email", "token"))
    
    dev_labels = ["개발팀", "DEV"]
    stg_labels = ["개발팀", "STG"]
    prd_labels = ["DevOps팀", "PRD"]
    dev_issueids = ["DEV-1234"]
    prd_issueids = ["DEVOPS-1234", "DEVOPS-1235"]

    jira.set_labels(dev_issueids, dev_lables)
    jira.set_labels(prd_issueids, prd_labels)


728x90
반응형
728x90
반응형

경로를 입력받아 폴더인지 파일인지 확인하기

 C++ 17로 윈도우에서 프로그램을 만들면서 폴더와 파일을 구분해야하는 경우가 생겨 아래 코드를 찾게되었다.

찾은 코드는 테스트 시 작동에는 문제가 없었지만 문자열을 LPCWSTR (WCHAR *)로 받아야 한다는 사소한 단점이 있었다. 혹시 String 클래스를 사용해 입력받은 경로가 폴더인지 파일인지 구분할 수 있는 방법이 있는지도 찾아봤지만, 검색을 해봐도 찾지 못했다.. 

int isFolder(LPCWSTR path) {
    /*
       args:
           LPCWSTR fileName : 파일의 full path
       return:
            int code : 폴더는 1, 파일은 0, 에러는 -1
        summary:
            폴더인지 파일인지 구분
   */
    WIN32_FIND_DATA wInfo;
    HANDLE hInfo = ::FindFirstFile(path, &wInfo);
    ::FindClose(hInfo);

    if (hInfo != INVALID_HANDLE_VALUE)
    {
        if (wInfo.dwFileAttributes & FILE_ATTRIBUTE_DIRECTORY)
        {
            return 1;
        }
        return 0;
    }
    return -1;
}

출처 : https://jangjy.tistory.com/388


int main() {
    cout << isFolder(L"C:\\Users\\user\\Downloads") << "\n";

    return 0;
}


String to LPCWSTR

 위 내용에서 함수를 찾긴했지만 입력받는 방식이 달라 사용이 어려웠다.

작성중인 프로그램에서는 문자열을 String 클래스를 사용하여 처리하기 때문에 변환이 필요했는데, 구글링을 통해 아래 코드를 알게 되었다.

std::wstring s2ws(const std::string& s)
{
    int len;
    int slength = (int)s.length() + 1;
    len = MultiByteToWideChar(CP_ACP, 0, s.c_str(), slength, 0, 0);
    wchar_t* buf = new wchar_t[len];
    MultiByteToWideChar(CP_ACP, 0, s.c_str(), slength, buf, len);
    std::wstring r(buf);
    delete[] buf;
    return r;
}


출처 : https://wiserloner.tistory.com/316 


위의 코드를 아래처럼 사용하면 변환된 결과를 얻을 수 있다.

int main() {
    std::wstring stemp = s2ws("C:\\Users\\user\\Downloads");
    LPCWSTR result = stemp.c_str();
    
    wprintf(result);
    
    return 0;
}


String으로 폴더 여부 확인하기

 이제 isFolder() 함수가 String을 사용해 경로를 확인할 수 있도록 수정해보자.

#include <windows.h>
#include <iostream>
#include <string>
#include <fstream>
#include <filesystem>
#include <vector>
#include <map>

using namespace std;


wstring s2ws(const string& s) {
    int slength = (int)s.length() + 1;
    int len = MultiByteToWideChar(CP_ACP, 0, s.c_str(), slength, 0, 0);
    wchar_t* buf = new wchar_t[len];

    MultiByteToWideChar(CP_ACP, 0, s.c_str(), slength, buf, len);
    wstring r(buf);
    delete[] buf;

    return r;
}

int isFolder(string path) {
    /*
       args:
           LPCWSTR fileName : 파일의 full path
       return:
            int code : 폴더는 1, 파일은 0, 에러는 -1
        summary:
            폴더인지 파일인지 구분
   */
    WIN32_FIND_DATA wInfo;
    HANDLE hInfo = ::FindFirstFile(s2ws(path).c_str(), &wInfo);
    ::FindClose(hInfo);

    if (hInfo != INVALID_HANDLE_VALUE){
        if (wInfo.dwFileAttributes & FILE_ATTRIBUTE_DIRECTORY){
            return 1;
        }
        return 0;
    }
    return -1;
}

int main() {
    cout << isFolder("C:\\Users\\user\\Downloads") << "\n";

    return 0;
}

728x90
반응형
728x90
반응형

python으로 QR-CODE 생성하려면 아래 qrcode[pil] 패키지를 import 한다.

pip install qrcode[pil]


아래 코드를 사용하면 png 형식으로 qrcode를 만들 수 있다.

import qrcode
    
img_url = qrcode.make("https://hwan001.co.kr/")
img_url.save("qrcode.png")


728x90
반응형
728x90
반응형

개요 및 구성

 웹 페이지에서 여러 대의 SSH 서버가 연결이 가능한지 여부를  UI로 확인하고 싶어서 만들었다.

구성은 Front, Back, SSH Server로 되어 있고 Front, Back은 Ajax를 사용하여 Json으로 데이터를 주고 받는다.

Front는 HTML과 Javascript, jquery-3.6.3.js의 ajax, Back은 FastAPI로 작성해 두었고 서버의 SSH 연결 상태를 확인하기 위해서 paramiko 패키지를 사용한다.


아래는 서버의 1대의 상태를 체크하는 과정을 요약한 그림이다.


Front

 UI는 Server Count에 서버의 대수를 입력하면 아래처럼 해당 수에 맞춰 인터페이스가 추가된다.

localStorage를 사용했기 때문에 페이지가 새로 고침되어도 해당 인터페이스가 유지된다.

3을 입력한 경우
10을 입력한 경우


 서버 정보를 입력하고 check를 누르면 위 구성에 따라 요청을 보내고, 결과는 아래와 같이 분류되어 Connection Status에 작성된다.

  • 진행 중인 경우, Work in progress.
  • 제한 시간 내에 연결이 안된 경우, timeout
  • 연결이 성공한 경우, ok
  • Callback 순서(error > complete > fail > always)에 따라 fail되었는데 응답을 못받은 경우, Fail

예시

ssh_server_status_checker.html 파일 

<!DOCTYPE html>
<html lang="ko">
<head>
    <script src="static/js/jquery-3.6.3.js"></script>
    <link rel="stylesheet" href="test.css">
    <meta charset="UTF-8">
    <title>SSH Server Status Checker</title>

    <script>
        var timerId = null;
        var max_serverCount = localStorage.getItem('max_serverCount');
        const server_url = "http://127.0.0.1:8000";

        function set_ServerCount(){
            max_serverCount = $('#text_server_count').val();
            localStorage.setItem('max_serverCount', max_serverCount);
            window.location.reload();
        }

        function statusTimer() {
            for(var i = 1; i <= max_serverCount; i += 1){
                sshServer_statusCheck(i);
            }
        }
        
        function StartClock(interval=3000) {
            timerId = setInterval(statusTimer, interval);
            statusTimer();
        }
        
        function StopClock() {
            if(timerId != null) {
                clearInterval(timerId);
            }
        }

        function sshServer_statusCheck(target){
            var html_result_id = target + "_status_result";
            var server_ip = $('#text_' + target + '_ip').val();
            var server_port = $('#text_' + target + '_port').val();
            var server_id = $('#text_' + target + '_id').val();
            var server_pw = $('#text_' + target + '_pw').val();
            var send_data = {
                key: target,
                ip: server_ip,
                port: server_port,
                id: server_id,
                pw: server_pw,
            };

            $('#' + html_result_id).html("Work in progress.", status);
            document.getElementById(html_result_id).style.color = "#FFEE11";

            $.ajaxSetup({'cache':true});
            $.ajax({
                url : server_url + "/statusCheck",
                type : "POST",
                dataType : "json",
                timeout : 2000,
                contentType : "application/json",
                data : JSON.stringify(send_data),
                success: function(data){
                    $('#' + html_result_id).html(data.status, status);
                    if(data.status == "ok"){
                        document.getElementById(html_result_id).style.color = "green";
                    }
                    else{
                        document.getElementById(html_result_id).style.color = "red";
                    }
                },
                error: function(request, status, error){
                    if(error == "timeout"){
                        $('#' + html_result_id).html(status, 200);
                        document.getElementById(html_result_id).style.color = "red";
                    }
                }
            })
            .fail(function(xhr, textStatus, errorThrown) {
                if ($('#' + html_result_id).text() == "Work in progress."){
                    $('#' + html_result_id).html("Fail", status);
                    document.getElementById(html_result_id).style.color = "red";
                }
            });
        }
    </script>
</head>
<body>
    <h3>SSH Server Status Checker</h3>
    <form class="my-box">
        <div>
            <label><b>Server Count : </b></label> <input type="text" placeholder="number" id="text_server_count" style="width: 50px;"> <input type="button" value="set" onclick="set_ServerCount();"><br>
            <hr>
            <label><b>Input Data</b></label><br>
            <script>
                var tmp_value;

                for(var i = 1; i <= max_serverCount; i += 1){
                    tmp_value = "server" + i;
                    document.write('<label>' + tmp_value + ' Settings : </label>');
                    document.write('<input type="text" id="text_' + tmp_value + '_ip" placeholder="IP Address" style="width: 100px;"> ');
                    document.write('<input type="text" id="text_' + tmp_value + '_port" placeholder="Port" style="width: 50px;"> ');
                    document.write('<input type="text" id="text_' + tmp_value + '_id" placeholder="ID" style="width: 50px;"> ');
                    document.write('<input type="password" id="text_' + tmp_value + '_pw" placeholder="PW" style="width: 50px;"> ');
                    document.write('<input type="button" value="check" onclick="sshServer_statusCheck(' + "'" + tmp_value + "'" + ');"> ');
                    document.write('<br>');
                }
            </script>
        </div>
        <hr>
        <label><b>Connection Status</b></label><br>
        <script>
            for(var i = 1; i <= max_serverCount; i += 1){
                tmp_value = "server" + i;
                document.write('<label>' + tmp_value + ' : </label><label id="server' + i + '_status_result"></label><br>');
            }
        </script>
        <label>Repeat check : </label>
        <input type="button" value="Start" onclick="StartClock();">
        <input type="button" value="End" onclick="StopClock();">
    </form>
    <br>
    <br>
</body>
</html>


Back

 아래 파이썬 백엔드 서버는 프론트에서 서버로 전달해준 Json을 파싱하여 내부의 서버 정보로 ssh 연결을 시도한다.

MVC 패턴은 적용하지 않았고, DB도 따로 구축하진 않고 dict_server_info라는 딕셔너리 자료구조를 이용했다.

import paramiko

import uvicorn
from fastapi import FastAPI
from pydantic import BaseModel
from starlette.middleware.cors import CORSMiddleware

def ssh_command_sender(ip, port, user, pw, cmds):
    ssh = paramiko.SSHClient()
    ssh.set_missing_host_key_policy(paramiko.AutoAddPolicy)
    ssh.connect(ip, port, user, pw, timeout=1)

    stdin, stdout, stderr = ssh.exec_command(";".join(cmds))

    lines = stdout.read()
    res = ''.join(str(lines))
    
    return res

def _health_check(ip, port, user, pw):
    try:
        ssh_command_sender(ip, port=port, user=user, pw=pw, cmds=[])
        return True
    except:
        return False


origins = ["*"]

app = FastAPI()
app.add_middleware(
    CORSMiddleware,
    allow_origins=origins,
    allow_credentials=True,
    allow_methods=["*"],
    allow_headers=["*"],
)

class serverSettings(BaseModel):
    key: str
    ip: str
    port: str
    id: str
    pw: str
    
dict_server_info = {
    #"server1":{"ip":"", "port":"22", "id":"", "pw":"", "status":""},
}

@app.post("/statusCheck")
async def statusCheck(info: serverSettings):
    key = info.key
    try:
        dict_server_info[key]["ip"] = info.ip
        dict_server_info[key]["port"] = info.port
        dict_server_info[key]["id"] = info.id
        dict_server_info[key]["pw"] = info.pw
    except:
        dict_server_info[key] = {"ip":info.ip, "port":info.port, "id":info.id, "pw":info.pw, "status":""}
        
    print(dict_server_info[key])

    print(f"{key} health check ...", end="")
    if _health_check(dict_server_info[key]["ip"], dict_server_info[key]["port"] , dict_server_info[key]["id"], dict_server_info[key]["pw"]) == False:
        print("error")
        return {"status":f"fail - {key} connect"}
    
    print("ok")
    dict_server_info[key]["status"] = "ok"
    return {"status":"ok"}
 

if __name__ == "__main__":
    uvicorn.run(app, port=8000, reload=False)


아래는 실제로 SSH 서버 vm을 실행하고 테스트해본 이미지이다.

1개의 서버를 체크할 경우 서버의 상태가 정상적으로 확인되었다.

1개 서버 체크
백엔드 로그 확인


 여러 개 서버의 경우로 우측 check 버튼을 통해 체크할 경우 다양한 현재 상태가 출력된다.

여러 개 서버를 각자 체크하기


주기적인 상태 체크

 위에서 체크 기능이 잘 동작하는걸 봤지만 프로그램이 내가 원하는 역할을 수행하게 하려면 입력한 정보를 일정 주기로 반복하여 체크할 수 있어야 한다. Repeat Check는 Timer를 활용하여 일정 주기(interval)로 ssh 연결을 시도한다.


후기

 간단한 기능을 제공하는 서버긴하지만 확장할 수 있는 내용들이 많다.

프론트에서는 html, css, js 파일을 분리하여 관리/ 확장성을 높이거나 React.js를 활용하여 더 깔끔하고 모던한 웹 사이트로 개선할 수 있고, 백엔드에서도 보안(openssl, oauth)과 디자인 패턴(MVC)을 적용하고 NoSQL DB와 연동해 볼 수 있을 듯 하다. 또한 DevOps 관점에서는 컨테이너화 시켜 쿠버네티스에 배포하고 GitOps를 적용해볼 수도 있다.

퇴근 후와 주말에만 가끔식 하는 프로젝트라 진행은 더디지만 하나씩 공부해서 Pluto에도 적용해보겠다.

728x90
반응형

'프로그래밍 > Web' 카테고리의 다른 글

[백엔드] Flask에서 JWT 토큰 생성하기  (0) 2022.09.18
백엔드 로드맵 정리  (0) 2022.09.12
[Django] 장고 기본 웹서버 띄우기  (0) 2022.03.28
728x90
반응형

requirements.txt

 파이썬으로 만든 코드에서 필요한 패키지를 쉽게 표현하기 위해 사용된다. 

내부는 아래처럼 필요한 패키지들의 이름을 적어준다.

pandas==1.3.5
numpy
tensorflow
tqdm
pandas_datareader
finance-datareader
beautifulsoup4
yfinance
pymongo
yahoo_fin
requests_html
flask
flask-cors
flask_restx
pytest

== 을 사용하여 필요한 버전을 명시해줄 수도 있다.


패키지 설치

 Python에서 패키지를 설치할 땐 pip 명령어를 사용한다.

위의 파일을 사용하여 패키지를 설치하려면 아래 명령어를 사용하면 된다.

pip install -r requirements.txt


하지만 매번 같은 명령어를 실행하기는 귀찮기 때문에 아래와 같은 pip_requirements.py 파일을 하나 더 많들어서 사용하고 있다.

import sys
import subprocess

if __name__ == '__main__':
    subprocess.check_call([sys.executable, '-m', 'pip', 'install', '--upgrade', 'pip'])
    subprocess.check_call([sys.executable, '-m', 'pip', 'install', '-r', 'requirements.txt'])


만약 pip가 없다면 아래 링크의 내용이나 밑의 코드를 실행하여 get-pip.py로 저장해주자.

# pip install
curl https://bootstrap.pypa.io/get-pip.py -o get-pip.py

# pip upgrade
python -m pip install --upgrade pip


728x90
반응형
728x90
반응형

FastAPI

FastAPI는 Python 3.6이상의 API를 빌드하기 위한 빠르고 현대적인 웹 프레임워크이다.
웹 부분을 위한 Starlette와 데이터 부분을 위한 Pydantic 덕분에 NodeJS와 Go에 대등할 정도로 높은 성능을 가지고 있으며, 빠른 코드 작성이 가능하다. 직관적이고 쉬운 코드로 인해 휴먼 에러가 약 40%(내부 개발팀 테스트 기준) 감소했다고 한다. 또한 API에 완전히 호환되는 개방형 표준을 기반으로 하여 Swagger(OpenAPI)와 json Schema를 지원한다.

개인적으로는 Flask와 문법이 비슷하지만 기본적으로 추가된 기능이 많고 Django보다는 자동화(?)는 덜 되었지만 훨씬 가볍고 빠르다는 느낌을 받았다.

자세한 내용은 아래 공식문서를 참고
https://fastapi.tiangolo.com/ko/


FastAPI

FastAPI FastAPI 프레임워크, 고성능, 간편한 학습, 빠른 코드 작성, 준비된 프로덕션 문서: https://fastapi.tiangolo.com 소스 코드: https://github.com/tiangolo/fastapi FastAPI는 현대적이고, 빠르며(고성능), 파이썬

fastapi.tiangolo.com


설치 및 실행

pip를 통해 설치한다. 제품화를 위해서는 Uvicorn이나 Hypercorn과 같은 ASGI 서버가 필요하다.
패키지의 설치는 https://hwan001.tistory.com/308 글을 참고하면 편하다.

pip install fastapi
pip install "uvicorn[standard]"


위 공식 링크에 있는 main.py 예제를 가져와봤다.

from typing import Union
from fastapi import FastAPI

app = FastAPI()

@app.get("/")
def read_root():
    return {"Hello": "World"}

@app.get("/items/{item_id}")
def read_item(item_id: int, q: Union[str, None] = None):
    return {"item_id": item_id, "q": q}

위 10줄의 코드로 2개의 엔드포인트가 완성된다.

코드를 실행하려면 uvicorn이 필요하다.

uvicorn main:app --reload


공식 문서에서는 위 명령어로 방법을 설명하지만, pip로 "uvicorn[standard]"을 install 하면 에러가 발생하고 명령어로 쳐봐도 당연히 실행되지 않는다. 그래서 아래처럼 python 코드 상에서 실행하는 방법을 찾았다.
실행에 문제가 없고 디버깅 측면에서도 더 좋다고 생각한다.

from typing import Union
from fastapi import FastAPI
import uvicorn # pip install uvicorn

app = FastAPI()

@app.get("/")
def read_root():
    return {"Hello": "World"}

@app.get("/items/{item_id}")
def read_item(item_id: int, q: Union[str, None] = None):
    return {"item_id": item_id, "q": q}

if __name__ == "__main__":
    uvicorn.run(app, port=8000)


코드를 실행 후 http://127.0.0.1:8000/items/5?q=somequery로 접속하면 JSON 응답을 볼 수 있고,


http://127.0.0.1:8000/docs (또는 redoc)로가면 Swagger UI로 자동 작성된 API 문서를 볼 수 있다.

docs
redoc


비동기 처리

FastAPI의 장점 중 하나는 비동기 처리를 지원한다는 점이다.
아래처럼 직접 작성한 코드나 라이브러리가 비동기 기능을 사용할 경우 async def 를 사용할 수 있다.

@app.get('/')
async def read_results():
    results = await some_library()
    return results


참고 링크

https://wikidocs.net/book/8531


점프 투 FastAPI

점프 투 FastAPI는 파이보라는 이름의 파이썬 게시판(Python Board) 서비스를 만들어가는 과정을 설명한 FastAPI 입문서이다. 파이썬 설치부터 시작하여 서…

wikidocs.net

https://github.com/tiangolo/fastapi


GitHub - tiangolo/fastapi: FastAPI framework, high performance, easy to learn, fast to code, ready for production

FastAPI framework, high performance, easy to learn, fast to code, ready for production - GitHub - tiangolo/fastapi: FastAPI framework, high performance, easy to learn, fast to code, ready for produ...

github.com


728x90
반응형
728x90
반응형

 이름이나 확장자는 다르지만 사실 동일한 파일이 있다.

이 2개의 파일을 코드로 구분하려면 어떻게 해야 할까? 그리고 디렉토리 내에 그런 파일들이 여러개 있다면 어떻게 찾을 수 있을까?


아래 파일은 get_tickers.py를 복사하여 .txt로 확장자를 바꾼 동일한 파일이다. 2개의 파일이 사실은 같다는 걸 코드로 확인해보자.


 파일이 동일하다는 걸 확인하려면 파일 전체를 해쉬로 만들어 값을 비교해보면 된다.

코드로 작성해보자.

import hashlib

def my_hash(file):
    with open(file, 'rb') as f:
        read_data = f.read()
        hash = hashlib.sha512()
        hash.update(read_data)
        hexSHA512 = hash.hexdigest()
        hashValue = hexSHA512.upper()

    return hashValue

file_a = "C:\\Users\\Hwan\\Desktop\\TestDir\\get_tickers.py"
file_b = "C:\\Users\\Hwan\\Desktop\\TestDir\\get_tickers.py.txt"
hash_a = my_hash(file_a)
hash_b = my_hash(file_b)

print(file_a)
print(file_b)
print(hash_a)
print(hash_b)
print(hash_a == hash_b)

파일의 내용을 sha512로 해싱해주는 함수를 작성했다.

코드를 실행하면 이름과 확장자는 달라도 내용은 같다는 걸 알 수 있다.


 폴더 내부를 전체 탐색하기 위해 아래 코드를 작성했다.

import os

workspace = "C:\\Users\\Hwan\\Desktop\\TestDir"
keywords = ["pass"]
list_result = []

for file in os.walk(workspace):
    if any([True if keyword in file[0] else False for keyword in keywords]): continue
    
    for x in file[2]:
        list_result.append(file[0] + "\\" + x)
        
print(list_result)


코드를 실행하면 입력받은 경로 밑의 (경로나 파일 명에 pass가 포함되지 않은) 모든 파일을 리스트에 담아준다.


이제 입력한 경로 내의 모든 동일한 파일을 찾도록 아래의 코드를 추가했다.

dict_hash = {}     
for file in list_result:
    try:
        dict_hash[my_hash(file)].append(file)
    except:
        dict_hash[my_hash(file)]= [file]

딕셔너리의 키로 파일 내용을 해싱한 값을 줬고, 값으로는 해당 해쉬값을 갖는 파일명 리스트를 담았다.


아래는 전체 코드이다.

import os
import hashlib

def my_hash(file):
    with open(file, 'rb') as f:
        read_data = f.read()
        hash = hashlib.md5()
        hash.update(read_data)
        hexSHA512 = hash.hexdigest()
        hashValue = hexSHA512.upper()

    return hashValue

workspace = "C:\\Users\\hwan\\Desktop"
keywords = ["pass"]
list_result = []

for file in os.walk(workspace):
    if any([True if keyword in file[0] else False for keyword in keywords]): continue
    
    for x in file[2]:
        list_result.append(file[0] + "\\" + x)
        

dict_hash = {}     
for file in list_result:
    try:
        dict_hash[my_hash(file)].append(file)
    except:
        dict_hash[my_hash(file)]= [file]
        
for x in dict_hash:
    if len(dict_hash[x]) > 1:
        print(x, dict_hash[x])


728x90
반응형

'프로그래밍 > Python' 카테고리의 다른 글

QR-CODE 생성하기  (2) 2023.03.29
[Python] requirements.txt로 패키지 설치하기  (0) 2023.01.12
FastAPI  (0) 2023.01.12
[Python] Docstring  (0) 2022.11.27
[Python] OS 모듈 : 디렉토리 전체 탐색하기 (하위 디렉토리까지)  (0) 2022.11.20
[python] JWT 모듈  (0) 2022.09.13
728x90
반응형

Docstring

 파이썬은 자료형이 명시되지 않기 때문에(언어의 동적 특성) 파이썬에서의 문서화는 매우 중요하다.

문서화를 위해서 파이썬은 docstring이라는 문서화 문자열 기능을 제공하고 """ 문서화 문자열입니다. """ 처럼 표현할 수 있다. docstring은 모듈, 클래스, 함수에 붙일 수 있고 각 객체의 __doc__ 속성에 접근하여 문자열을 가져올 수 있다. 어떤 대상에 docstring을 작성할 지에 따라 적어야하는 내용들도 달라진다. 

*더 많은 내용은 https://peps.python.org/pep-0257/ 를 참고


모듈 docstring

 각 모듈에는 최상위 docstring이 필요하다.

docstring의 첫문장은 모듈의 목적을 기술하는 한 문장으로 구성되며 이후는 모듈의 동작을 자세히 설명한다.


예시)

"""
Library for testing

Test Module info

Available functions:
- func1 : test function 1
- func2 : test funtion 2
"""
...


클래스 docstring

 클래스 수준의 docstring은 모듈 docstring과 거의 비슷하다.

첫 번째 문장에서 클래스의 목적을 기술하고 이후는 동작을 설명한다. 그리고 공개속성과 메서드, 서브클래스가 슈퍼클래스와 상호작용하는 방법등을 안내해야한다.


예시)

class Test(object):
"""
Represents a test

class info

Public attributes:
- test_code : test code
- test_result : result
"""
...


함수 docstring

 함수의 docstring에서는 첫 줄에 수행하는 일, 다음 줄부턴 함수의 특별한 동작이나, 인수에 대한 내용 또는 반환 값을 설명한다. 또한 호출 시 함수 인터페이스에서 처리해야하는 예외도 설명해야 한다.


예시)

def Test_func(code):
"""
Testing target

function info

Args:
- code : String of the target Code

Returns:
- Boolean (True if Test is succeed)
"""
...


함수가 인수를 받지 않을 경우는 한 줄의 설명으로도 충분하고 아무것도 반환하지 않는다면 Returns는 생략해도 된다.

만약 함수가 가변인수를 사용할 경우, Args 항목에 *args, **kwargs를 적고 목적을 설명해줘야 한다.

728x90
반응형
728x90
반응형

디렉토리 탐색

 모든 하위 디렉토리 내부 파일까지 포함된 전체 파일의 목록을 가져오기 위해 파이썬으로 코드를 작성하려고 한다.

그런데 디렉토리(또는 폴더) 내부에 하위 디렉토리가 있다면?

그리고 그 디렉토리 내부에 하위 디렉토리가 있는지 없는지 모른다면?

코드를 어떻게 작성해야 될까?


먼저 파이썬에서 경로를 다루기위해  os 패키지를 import 했다.

그리고 아래와 같은 디렉토리 구조(주석)를 만들어 둔 뒤 하위 디렉토리 어딘가에 FindMe.txt 파일을 숨겨두었다!

#Find_TMP
#┣━1234
#┗━TEST
#  ┗━TEST1

import os


os 모듈 내부의 메소드들을 사용해서 FindMe.txt 파일이 어디에 있는지 찾아보자.

os.listdir() 메소드를 사용하면 입력한 폴더 내부에 존재하는 파일과 디렉토리를 모두 가져올 수 있다.

def findFiles(root):
    files = os.listdir(root)
    for file in files:
        path = os.path.join(root, file)
        if os.path.isdir(path):
            print("Directory :", path)
        else:
            print("File :", path)
      
findFiles("C:/Users/Hwan/Desktop/Find_TMP")


Find_dir의 하위 디렉토리인 1234와 TEST는 잘 찾았지만 우리가 원하는 FindMe.txt 파일은 찾지 못했다.

1234와 TEST 내부까지 확인하려면 그리고 내부에 우리가 알지 못하는 디렉토리가 있다면 어떻게 해야될까?


재귀를 이용한 디렉토리 탐색

  디렉토리 내부에 디렉토리, 그리고 그 내부에 디렉토리 그리고 또 하위 디렉토리.. 만들어둔 구조를 보고 있으면 뭔가 떠오르는 것 같다..! 


재귀를 사용해서 모든 경로를 확인해보자.

def findFiles_recursion(path):
    for x in os.listdir(path):
        subdirectory_path = f"{path}/{x}"
        print(subdirectory_path)
        if os.path.isdir(subdirectory_path):
            findFiles_recursion(subdirectory_path)
            
findFiles_recursion("C:/Users/Hwan/Desktop/Find_TMP")

우리가 원하던 FindMe.txt 파일을 드디어 찾았다!

위 구조에선 숨겨져있던 Secret 디렉토리 내부까지 확인이 되었다.


하지만 만약 폴더의 구조가 매우 깊다면 재귀를 사용한 함수는 Runtime Error를 뱉는다.

import sys
sys.setrecursionlimit(10000)

물론 이런 코드를 추가하면 좀 더 깊게 탐색할 수는 있지만 스택을 사용하면 더 좋을 것 같다.


코드로 작성해보자.

def findFiles_stack(path):
    list_stack = [path] 
    
    while list_stack.__len__():
        cur_path = list_stack.pop()
        
        for x in os.listdir(cur_path):
            _path = os.path.join(cur_path, x)
            if os.path.isdir(_path):
                list_stack.append(_path)
            print(_path)
            
            
findFiles_stack("C:/Users/Hwan/Desktop/Find_TMP")

탐색 순서는 조금 다르지만 이제 깊이에 상관없이 FindMe.txt를 찾을 수 있게 되었다!


os.walk

 그런데 사실 파이썬의 os 모듈에서는 위에서 고민했던 내용들을 한번에 해결해줄수 있는 메소드를 제공한다.

for x in os.walk("C:/Users/Hwan/Desktop/Find_TMP"):
    print(x)

하위 디렉토리까지 모든 경로를 찾고 싶을 땐 os.walk 메소드를 쓰도록 하자!


728x90
반응형

'프로그래밍 > Python' 카테고리의 다른 글

FastAPI  (0) 2023.01.12
[Python] 디렉토리 내부의 동일한 파일 찾기  (1) 2022.12.10
[Python] Docstring  (0) 2022.11.27
[python] JWT 모듈  (0) 2022.09.13
[Python] Yahoo_fin 모듈  (0) 2022.09.11
[Python] Paramiko 모듈  (0) 2022.07.07
728x90
반응형

flask_jwt_extended

 flask에선 flask_jwt_extended라는 이름으로 jwt 토큰에 대한 기능을 제공해준다. 

토큰 인증에 대한 테스트는 POSTMAN으로 했고, JWT에 대한 내용은 아래 글을 참고하면 좋을 것 같다. 

https://hwan001.tistory.com/277


[python] JWT 모듈

JWT (Json Web Token)  JWT는 웹 표준(RFC 7519) 으로 두 개체 사이에서 JSON을 사용하여 정보를 안전성 있게 전달해준다. 웹에서 로그인을 하거나 인증을 받게되면 보통 세션을 사용하여 인증 정보를 기

hwan001.co.kr


Access 토큰 생성하기

config.py

flaskJwt_secret_key = "secret_key"
flask_admin_id = "admin"
flask_admin_pw = "1234"


app.py

import sys
import subprocess

try:
    from flask import Flask
    from flask import request, render_template, make_response, jsonify, session, redirect, url_for, Response
    from flask_jwt_extended import jwt_required, get_jwt_identity, create_access_token, JWTManager

except:
    subprocess.check_call([sys.executable, '-m', 'pip', 'install', '--upgrade', 'pip'])
    subprocess.check_call([sys.executable, '-m', 'pip', 'install', '-r', 'requirements.txt'])


import config

app = Flask(__name__)
app.config['JWT_SECRET_KEY'] = config.flaskJwt_secret_key
app.config['JWT_ACCESS_TOKEN_EXPIRES'] = timedelta(hours=1) # 기본설정은 15분

jwt = JWTManager(app)

# 메인 페이지
@app.route('/')
def main():
    return render_template('main.html')

# 로그인 정보가 일치할 경우, 토큰을 생성한다.
@app.route("/login", methods=['POST'])
def login():
    input_data = request.get_json()
    
    user_name = input_data['id']
    user_pw = input_data['pw']
	
    if (user_name == config.flask_admin_id) and (user_pw == config.flask_admin_pw):
        return jsonify(result = "True", access_token = create_access_token(identity = user_name))
        
    return jsonify(result = "False")


postman


토큰 사용하기


app.py

#from flask_jwt_extended import jwt_required, get_jwt_identity

@app.route("/my_jwt_test", methods=['GET'])
@jwt_required()
def my_jwt_test():
    current_user = get_jwt_identity() 
    
    return jsonify(logged_in_as=current_user), 200


postman


728x90
반응형
728x90
반응형

JWT (Json Web Token)

 JWT는 웹 표준(RFC 7519) 으로 두 개체 사이에서 JSON을 사용하여 정보를 안전성 있게 전달해준다.

웹에서 로그인을 하거나 인증을 받게되면 보통 세션을 사용하여 인증 정보를 기록하는데, JWT는 토큰 내부의 Signature에 해당 정보를 기록한다. JWT를 사용할 경우 인증을 위해 웹 브라우저의 세션 공간을 사용하지 않고 인증 여부를 알 수 있기 때문에 확장성이 좋다. 또한 생성 시 권한을 지정할 수 있어 각 토큰별로 기능을 제어할 수 있고 플랫폼에 종속적이지 않다.


JWT의 구조는 Header.Payload.Signature로 나뉘어져 있다. Header는 토큰의 typ(해당 토큰의 타입)과 alg(해싱 알고리즘)을 Payload는 토큰에 담을 정보를 그리고 마지막 Signature는 Header와 Paylaod의 Base64 인코딩 값을 시크릿 키와 함께 다시 한번 해싱한 후 인코딩한 값을 가진다.


파이썬의 PyJWT 패키지를 사용해서 직접 토큰을 만들고 검증해보자.


구현

 파이썬에서의 jwt 사용은 아래처럼 PyJWT를 설치하거나 requirements.txt에 작성해두고 사용할 수 있다.

간단하게 토큰의 생성과 검증하는 기능을 만들어 보았다.

pip install PyJWT


import sys
import subprocess

try:
    import jwt

except:
    subprocess.check_call([sys.executable, '-m', 'pip', 'install', '--upgrade', 'pip'])
    subprocess.check_call([sys.executable, '-m', 'pip', 'install', '-r', 'requirements.txt'])
    
    import jwt


class Jwt():
    def __init__(self, payloads, secret_key):
        self.payloads = payloads
        self.algorithm = "HS256"
        self.secret_key = secret_key

    def create_token(self):
        return jwt.encode(self.payloads, key=self.secret_key, algorithm=self.algorithm)

    def verify_token(self, token):
        try:
            payload = jwt.decode(token, key=self.secret_key, algorithms=self.algorithm)
        except jwt.ExpiredSignatureError:
            return "토큰 인증 만료"
        except jwt.InvalidTokenError:
            return "토큰 검증 실패"
        
        return payload


if __name__ == '__main__':
    payload = {"id":"hwan"}
    my_jwt = Jwt(payload, "secret")
    token = my_jwt.create_token()

    print("token : ", token)
    print("payload : ", my_jwt.verify_token(token))


결과


후기

 JWT를 직접 구현할 수도 있겠지만 파이썬의 JWT 패키지를 사용한다면 간단하게 토큰을 만들어볼 수 있다. 

위에서 생성한 토큰은 아래 사이트에서도 검증이 가능하다. 직접 구현해볼 땐 아래 사이트를 활용하면 도움이 될 것 같다.

https://jwt.io/


JWT.IO

JSON Web Tokens are an open, industry standard RFC 7519 method for representing claims securely between two parties.

jwt.io

728x90
반응형
728x90
반응형

 백엔드 공부를 하다보면 볼 수 있는 로드맵 이미지이다.

각 내용을 정리하고 개인적으로 필요하다고 생각하는 내용들도 조금 추가해 보았다.

백엔드 로드맵


Internet

How does the internet work? 

  • 패킷과 프로토콜을 OSI 7을 기반으로 설명
  • A PC의 프로그램에서 B PC에 위치한 프로그램으로 패킷이 전달되는 과정
  • Private IP와 Public IP
  • 라우터와 스위치
  • 전송 계층의 전송 장비
  • CIDR, 서브네팅, 클래스


What is HTTP?

 HTTP가 무엇인지에 대한 설명, 아래 요소들을 설명하면 되는데 조금 더 나가면 브라우저에 대한 내용과 HTTPS와의 차이를 같이 말할 수 있을 듯 하다.  

  • 브라우저에 대한 이야기 (7계층에 위치한 프로그램의 일종)
  • HyperText Transfer Protocol, HTML과 관계
  • TCP 기반이지만 HTTP/3부턴 UDP 기반
  • GET, POST, PUT, DELETE 등의 메소드


Browsers and how they work?

 브라우저가 뭐고 어떻게 작동되는지를 물어본 질문이다.

부라우저의 구조를 설명하면서 작동원리를 말하면 될 것 같다.

  • UI/ UI 백엔드
  • 네트워킹
  • 렌더링 엔진
  • 브라우저엔진
  • 데이터 저장
  • 자바스크립트 인터프리터

** Jinja와 파이썬 인터프리터에 대한 이야기도 하면 좋을 듯


DNS and how it works?

 Domain Name Server에 대한 설명, 역할, 알려진 서버 (구글 8.8.8.8) 등


What is Domain Name?

 도메인과 아이피에 대한 개념


What is hosting?

 도메인 관리, 왜 필요하고 어떻게 하는지 예시를 들어 말하면 좋을 듯 함

(ex. 국내 호스팅 제공 업체에서 도메인 구입 후 이용 중), 레코드에 대한 개념도 추가로 공부하면 좋을 듯


Basic Fronted Knowledge

 프론트를 만들기 위한 기본 지식으로 아래 언어들을 공부해야 한다.

  • HTML : HyperText Markup Language
  • CSS : Cascading Style Sheets
  • JavaScript + JavaScript Library (jQuery, react)


Basic Backend Knowledge

 백엔드를 만들기 위한 기본 지식으로 아래 언어들을 공부해야 한다.

여러 방법으로 만들 수 있는데 본인이 자신 있는 언어를 기반으로 프레임워크를 다루는 게 좋을 것 같다.

(국내에선 자바 + 스프링 만한게 없다고 생각한다.)

  • 자바/jsp + Spring framework
  • Python + Django/Flask/FastAPI framework
  • Node js + Express


OS and General Knowledge

 Basic Terminal Commands, Terminal Usage, POSIX Basics은 직접사용하면서 익히고 나머지 운영체제에 대한 내용들은 공룡책보자..!

  • Terminal Usage
  • How OSs Work in General : OS 작동 원리
  • Process Management : 프로세스 관리
  • Threads and Concurrency
  • Basic Terminal Commands : Grep, awk, sed, lsof, curl, wget, tail, head, less find, ssh, kill
  • Memory Management
  • Interprocess Communication
  • I/O Managemanet
  • POSIX Basics : stdin, stdout, stderr, pipes
  • Basic Networking Concepts


Learn a Language

 Java, C#, PHP, RUST, GO, JavaScript, Python, Ruby, C++ 등 프로그래밍 언어


Version Control Systems 

 코드의 형상 관리와 버전 관리를 위해 Git 또는 Subversion(SVN) 을 사용한다.

각 도구의 차이점과 특징, 사용법 등을 알아두면 좋을 것 같다.

  • Basic Usage of Git
  • Repo hosting services : GitHub, GitLab, Bitbucket


Databases

 SQL 쿼리를 사용하는  RDB(관계형 데이터베이스)와 NoSQL DB의 차이를 알고 각 디비를 프로그램에서 연동해보면 좋을 듯 하다. 테이블 설계와 최적화, 샤딩 등을 추가로 해보면 좋다.

  • Relational Databases : PostgreSQL, MySQL, MariaDB, MS SQL, Oracle
  • NoSQL : MongoDB, RethinkDB, CouchDB, DynamoDB
  • More about Databases : ORMs, ACID, Transactions, N+1 Problem, Database Normalization, Indexes and how they work Data Replication, Sharding Strategies, CAP Theorem


Learn about APIs

REST와 GraphQL 차이와 사용법을 다른 글에서 작성 중이다.

Swagger와 JSON, JWT는 기본적으로 알아두어야된다고 생각한다.

  • HATEOAS
  • Open API Spec and Swagger
  • Authentication : twilio, opt, e-mail, JWT
  • REST 
  • Graph QL : Apollo, Relay Modern
  • JSON APIs
  • SOAP


Caching

CDN과 Redis에 대해서 알아볼 예정이다.

Redis는 In-Memory DB로 알고있는데 Caching으로 분류된게 의문이지만 일단 넣어두었다.

  • CDN
  • Server Side : Redis, Memcached
  • Client Side 


Web Security Knowledge

해싱, SSL/TLS, CA인증서 등에 대해서 알아보자. 좀 더 확장하면 RSA, ECC 등의 암호화 알고리즘을 공부해봐도 좋을 것 같다.(SSL 안에서 사용된다.)

  • Hashing Algorithms : MD5 and why not to use it, SHA Family, scrypt, bcrypt
  • HTTPS, CORS, Content Security Policy, SSL/TLS, OWASP Security Risks


Testing

테스트 기법과 테스트 자동화

  • Intergration Testing
  • Unit Testing
  • Functional Testing
  • Test Automation : 라노렉스, Python, Guitar 등


CI/ CD

DevOps와 더 큰 연관이 있다고 생각한다. 시간될 때 공부해두자.

  • GitOps : GitLab, ArgoCD
  • K8S 
  • Jenkins


Design Patterns and Development Principles

MVC, DDD, TDD 위주로 공부하자.

  • MVC (Model View Control)
  • GOF (Gang Of Four)
  • DDD (Domain Driven Design)
  • TDD (Test Driven Development)
  • SOLID
  • KISS
  • YAGNI
  • DRY


Architectural Patterns

아키텍쳐에 대한 내용을 알고 있는 것과 모르는 것의 차이는 크다고 생각한다. 

MA, MSA, Serverless 정도만 알면 될 것 같다.

  • MA (Monolithic Architecture)
  • MSA (Micro Services Architecture)
  • Serverless
  • SOA
  • CQRS and Event Sourcing


Search Engines

로그 등의 빅데이터를 수집하고 검색할 수 있는 엔진 (키바나는 가시화 도구)

  • Elasticsearch(+kibana)
  • Solr


Message Brokers

  • RabbitMQ
  • Kafka


Containerization vs Virtualization

컨테이너화와 가상화에 대한 내용인 듯 하다. 

Docker를 위주로 공부하자. (사용법, 컨테이너 개념)

  • Docker
  • rkt
  • LXC


Graph Databases

  • Neo4j


WebSockets


Web Servers

외부 사용자들의 접근을 위한 웹 서버들이다. config 작성방법과 백엔드(Python일 경우 Gunicon 또는 uwsgi) 연동을 해보면 좋을 것 같다.

  • Nginx
  • Apache
  • Caddy
  • MS IIS


Building for Scale

마이그레이션과 수직적, 수평적 확장을 제외하고 잘 모르겠다. 하나씩 알아보자.

  • Mitigation Strategies : Graceful, Degrodation, Throttling, Backpressure, LoadShifting, Circuit Breaker
  • Understand the Diff : Instrumentation, Monitoring, Telemetry
  • Migration Strategies
  • Horizontal vs Vertical Scaling
  • Building with Observability in mind


728x90
반응형
728x90
반응형

Yahoo_fin 모듈

  yahoo_fin은 시가총액, 배당수익률, 종목에 대한 최신 정보를 제공하는 Python 3 패키지이며, 아래 추가 기능들을 제공한다.

  • 손익 계산서/ 대차 대조표/ 현금 흐름표/ 재무 상태 표
  • 보유자 정보 및 분석가 데이터 스크래핑
  • 가상자산(암호화폐) 데이터
  • 현재 거래일 실시간 주가 및 거래 상위 종목
  • 옵션 가격 및 만료 날짜 검색 모듈
  • 수입 캘린더 기록
  • 금융 뉴스 RSS 피드 스크랩

yahoo_fin은 stock_info module, options module 두 가지 모듈로 구성된다.

자세한 옵션이 궁금하면 아래 링크들에서 찾아보자.


https://algotrading101.com/learn/yahoo-finance-api-guide/ 


Yahoo Finance API - A Complete Guide - AlgoTrading101 Blog

The Yahoo Finance API is a range of libraries/APIs/methods to obtain historical and real time data for a variety of financial markets and products.

algotrading101.com

https://officejs.files.wordpress.com/2020/05/how-to-download-fundamentals-data-with-python.pdf


 코드

pip install yahoo_fin


# requirements.txt : requests_html, yahoo_fin 추가

import sys
import subprocess

try:
    from yahoo_fin.stock_info import *

except:
    subprocess.check_call([sys.executable, '-m', 'pip', 'install', '--upgrade', 'pip'])
    subprocess.check_call([sys.executable, '-m', 'pip', 'install', '-r', 'requirements.txt'])
    
    from yahoo_fin.stock_info import *


if __name__ == '__main__':
    ticker = "JEPI"

    if ticker in tickers_dow():
        print("dow")
    if ticker in tickers_other():
        print("other")
    if ticker in tickers_sp500():
        print("sp500")
    if ticker in tickers_ftse250():
        print("ftse250") 
    if ticker in tickers_ftse100():
        print("ftse100")
    if ticker in tickers_ibovespa():
        print("ibovespa")
    if ticker in tickers_nasdaq():
        print("nasdaq")

    print(get_data(ticker))


후기

 yfinance, FinanceDataReader 등을 사용봤지만 전체 티커의 목록을 얻어오거나 실시간 데이터를 얻기엔 불편한 점이 있었다. yahoo_fin에선 여러 소스에서 스크랩과 api를 활용하여 데이터를 받아오기 때문에 실시간 데이터와 전체 목록을 얻어오는 기능이 필요하다면 유용하게 사용할 수 있다. 하지만 내부 코드를 보면 위키피디아 등에서도 데이터를 스크랩해오는데.. 누구나 수정할 수 있는 위키피디아의 특성 상 항상 신뢰하긴 어려울 수도 있을 것 같다.


728x90
반응형
728x90
반응형


passwd에 stdin으로 패스워드 전달하기

usernam="root"
password="12345"
echo $password | passwd --stdin $username


여러 파일에서 특정 키워드 찾기

keyword="alias"
path="/root/"
filename=".bash_profile"
grep $keyword `find $path -name $filename`


여러 파일에서 특정 문자열 변경하기

source="127.0.0.1"
dest="192.168.0.100"
path="/etc/"
filename="ifcfg-*"

sed -i s/$source/$dest/g `find $path -name $filename`


여러 파일에서 (특수기호 공백 제외하고) 특정 문자열 검색

#!/bin/bash
egrep -v '^[[:space:]]*(#.*)?$' `find $path -name $filename` | grep "$1" | grep "$2"


입력받은 알파벳 대문자, 소문자로 변경하기

read input
input="`echo $input | tr [A-Z] [a-z]`"


ssh-key 원격 서버에 복사하기

ssh-copy-id -i ~/.ssh/id_rsa.pub root@192.168.0.123


Reverse SSH로 원격지에서 스크립트 실행하기

scp -P 22 ./script_file.sh root@192.168.0.123:/root
ssh root@192.168.0.123 -p 22 "/bin/bash < script_file.sh"


tar.gz 압축 쉽게하기

tar -czvf $1.tar.gz $1


압축해제 함수

function tar_xvzf() {
	local File=$1.tar.gz
	local Dir=`echo $File | sed 's/.tar.gz//g'`	
	
	if [[ ! -d $Dir ]]; then
		#echo $Dir " - not exist"
		if [[ ! -f $File ]]; then
			#echo $File " - exist"
			echo "<Start Release - $File >"

			tar -xvzf $File

			echo "<End Release - $File >"
		fi
	fi

	#echo ""
}

tar_xvzf "test*"


압축파일 원격지에 전송하고 해제하기

scp $1 root@192.168.0.123:/root
ssh root@192.168.0.123 "tar -xzvf $1"


오늘 날짜 구하기

local date_today=`date "+%Y%m%d"`
echo ${date_today}
728x90
반응형
728x90
반응형

프로그램 제작 이유

 만약 PC와 모니터가 2대씩 있을 때 각 PC를 둘 다 듀얼 모니터로 사용하고 싶다면 어떻게 하는게 좋을까?
가장 쉽게 문제를 해결하려면 매번 사용하는 PC의 HDMI 케이블을 바꿔서 연결하면 된다!


만약 그것도 귀찮다면 KVM 스위치를 구매해 연결해두고 필요한 PC의 버튼이나 단축키를 눌러서 사용하면 된다.
(망 분리 환경이라면 보통 Aten과 같은 회사의 보안 인증이 된 제품을 지급해준다. 하지만 개인이 구매하기 어렵고 비싸다..!)
하지만 PC를 사용하다보면 양쪽 PC를 동시에 활용해야하는 경우가 꽤 많았고 개인적으로 KVM에서 듀얼 모니터 설정이 더 어려웠던 것 같다.

차라리 아래처럼 케이블을 전부 연결해두고 모니터 버튼으로 필요할 때마다 입력소스를 바꿔주는게 더 편하다.


많이 편해졌지만 여전히 몸을 움직여 버튼을 눌러야 하고 만약 PC 1을 듀얼로 사용하던 중에 PC 2를 듀얼로 사용하려면 버튼을 두번 눌러야 한다.

여러 대의 PC를 하나의 인터페이스로 다루는 KVM과 사용자의 편의를 위한 듀얼 모니터를 최소의 움직임으로 사용할 순 없는 걸까?

프로그램을 만들어보기로 했다.


MCCS, DDC/CI, VCP Code

 MCCS (Monitor Control Command Set)는 모니터 제어 명령 세트로 VESA (Video Electronics Standards Association)에서 개발한 컴퓨터 디스플레이 표준이다.
보통 PC나 셋탑박스 같은 장치에서 모니터를 제어하기 위한 바이너리 프로토콜로 사용되지만, 해당 글에서는 프로그램 제작을 위해 사용하려고 한다.

MCCS를 활용하면 DDC/CI (Display Data Channel/ Command Interface)와 VCP (Virtual Control Panel) 코드를 통해 모니터에 명령을 보낼 수 있다.

VCP 코드는 가상 제어 패널의 약어로 아래 이미지와 같은 표준 명령어 타입을 따른다.

VCP 코드


정해진 값을 약속된 프로토콜로 모니터에 명령을 전달하면 모니터가 해당 동작을 수행한다.
예를 들어 VCP 코드로 0xD6을 넣어주면 모니터의 전원이 On/Off되고, 0x60을 전달하면 모니터의 입력 소스가 변경된다.

현재 만들어지는 모니터는 대부분(거의 전부) 해당 표준을 따르기 때문에 코드만 잘 전달하면 정말 편할 것 같다..!
근데 모니터에 코드를 어떻게 전달하라는 걸까?

여러 방식이 있겠지만 난 보통 윈도우를 많이 사용하기 때문에 exe 프로그램을 제작하기로 했다.
Windows API를 통해 모니터로 VCP 코드를 보내보자.


모니터 제어 API

 일반적으로 모니터와 관련된 API를 검색하면 모니터의 핸들을 얻어오거나 정보를 얻어오기 위해 MONITORINFOEXA와 같은 구조체나 GetMonitorInfo()와 같은 함수를 사용한다. 하지만 제어를 위해서는 DDC/CI 프로토콜에 맞춰서 모니터로 데이터를 보내주어야 한다.

다행히 MSDN에서 DDC/CI를 사용하는 API들을 찾을 수 있었다. (만약 없었다면 따로 라이브러리(dll)가 존재하긴 한다.)
https://docs.microsoft.com/ko-kr/windows/win32/monitor/monitor-configuration


구성 모니터링(구성 모니터링) - Win32 apps

모니터 구성

docs.microsoft.com


MCCS 표준을 따르면 모니터 버튼으로 할 수 있는 동작 대부분을 프로그램으로 수행할 수 있지만 지금은 모니터 입력 소스만 정확하게 변경하면 된다.

위에서 VCP 코드를 DDC/CI 프로토콜에 따라서 모니터로 보내주기만 하면 기능이 수행된다고 했었다.
그런데 MSDN을 보면 API들은 내부적으로 DDC/CI를 사용하여 모니터에 명령을 보내준다고 되어 있기 때문에, VCP 코드만 제대로 맞춰서 전달해주면 될 것 같다.

이제 VCP 코드를 내가 원하는 모니터로 전달해주는 방법을 찾아야된다.


High-Level/ Low-Level Monitor 구성 함수

 위 MSDN 링크에 들어가보면 High-Level과 Low-Level로 나뉘어진 함수들을 볼 수 있는데, 이 중 나에게 필요한 내용은 VCP 코드를 다룰 수 있는 Low-Level 함수들이다.

MSDN의 Low-level Monitor 함수 사용법


대충 윈도우에서 감지한 모니터들을 알려주는 Enum 함수와 VCP 관련된 함수들을 알려주는데, 8번의 SetVCPFeature 함수가 눈에 띄였다.

https://docs.microsoft.com/en-us/windows/win32/api/lowlevelmonitorconfigurationapi/nf-lowlevelmonitorconfigurationapi-setvcpfeature


SetVCPFeature function (lowlevelmonitorconfigurationapi.h) - Win32 apps

Sets the value of a Virtual Control Panel (VCP) code for a monitor.

docs.microsoft.com

_BOOL SetVCPFeature(
  [in] HANDLE hMonitor,
  [in] BYTE   bVCPCode,
  [in] DWORD  dwNewValue
);


SetVCPFeature 함수는 위와 같은 형태로 되어 있다.
Enum 함수 등으로 얻어온 모니터의 핸들을 구해서 넣고 원하는 VCP Code 값을 넣으면 될거 같다.
이제 변경을 원하는 모니터와 원하는 VCP 기능을 전달하는 방법은 알았다.

그런데 우리의 상황처럼 1개의 모니터에 연결된 케이블이 여러 개라면 원하는 케이블은 어떻게 설정해야 되는 걸까?

이 방법을 알기 위해 엄청난 검색을 했는데..
방법은 의외로 간단했다.
3번째 인자인 dwNewValue에 해당 케이블의 값을 넣어주면 된다!
그렇다면 그 값은 어떻게 알 수 있을까??

다시 엄청난 삽질이 시작됐다.


GetVCPFeatureAndVCPFeatureReply() 함수

 온갖 키워드와 방법으로 검색해 알게된 방법은 GetVCPFeatureAndVCPFeatureReply() 함수를 사용하는 것 이었다.
그런데 위의 MSDN 이미지의 7번을 자세히 보면 이미 설명이 잘 되어 있다.
MS에선 처음부터 전부 다 알려주었지만 내가 이해를 못했을 뿐이다. (멍청하면 손발이 고생한다..)

https://docs.microsoft.com/en-us/previous-versions/ms775219(v=vs.85)


GetVCPFeatureAndVCPFeatureReply Function

Table of contents Monitor GetVCPFeatureAndVCPFeatureReply Function  Article 11/02/2006 2 minutes to read In this article --> Monitor Configuration API GetVCPFeatureAndVCPFeatureReply Function Retrieves the current value, maximum value, and code type of a

docs.microsoft.com

  BOOL GetVCPFeatureAndVCPFeatureReply(
    HANDLE
    hMonitor,

    BYTE
    bVCPCode,

    LPMC_VCP_CODE_TYPE
    pvct,

    LPDWORD
    pdwCurrentValue,

    LPDWORD
    pdwMaximumValue

  );


함수를 살펴보면 먼저 SetVCPFeature 함수와 비슷하게 모니터의 핸들과 VCP 코드를 요구한다.
그리고 3, 4번째 인자를 통해 Current Value 값과 Maximum Value 값을 얻어 낼 수 있었다.
(cf. 일반적으로 return을 통해 함수의 결과를 받지만 return으로는 하나의 값만 반환받을 수 있기 때문에 포인터 형태로 비어있는 변수를 전달해주면 알아서 채워준다.)

위의 함수를 잘 사용하면 모니터에 연결되어 있는 케이블들의 Value 값을 구할 수 있다.
(HDMI, DP, VGA등에 따라 값이 다르다.)

이제 SetVCPFeature() 함수를 사용하는데 필요한 모든 데이터를 구했다.

하지만 아직 마지막 한 가지 문제가 남아있다.
모니터의 제조사나 모델마다 해당 Value의 값이 다르다는 것이다ㅋㅋ
(예를 들면 A사의 A1 모니터는 HDMI의 Value가 10이고, B사의 B1모니터는 101이다. 심지어 같은 제조사의 다른 제품일 경우도 값이 다른 경우가 있었다.)

위의 API들을 잘 조합하면 자동으로 구할 수 있을 것 같았지만, 더 삽질하면 주말동안 끝내지 못할 것 같아 모니터들의 값을 알아낸 뒤 그냥 하드코딩했다.


코드

 먼저 프로그램의 기본 골격은 https://hwan001.tistory.com/1?category=1041434 글의 코드를 사용했다.
아무것도 없는 윈도우를 띄워주는 코드이다.

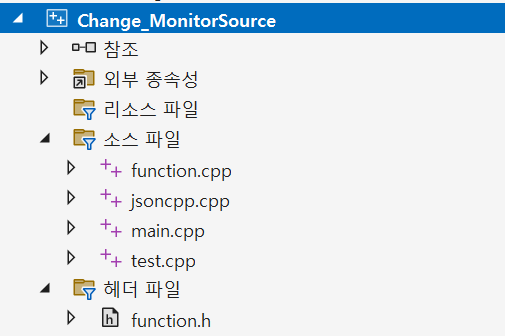
개발 환경은 Visual Studio Community 2022이고 프로젝트는 아래 이미지처럼 구성했다.

jsoncpp.cpp는 c++에서 json 파싱을 위해 나중에 추가한 라이브러리 코드이고 test.cpp는 테스트 함수를 작성해둔 파일이라 생략했다.
그리고 사실 EnumDisplayMonitors 함수는 MonitorEnumProc라는 콜백 함수를 내부에서 호출하기 때문에 SetVCPFeature 함수를 사용하기 위해서 콜백 함수들을 작성해야 하는데, 해당 내용들은 나중에 시간되면 추가로 작성해보겠다.

코드는 돌아가게만 만들어 두었기 때문에 정리도 잘 안되어 있지만 이것도 나중에 정리하기로 하고 일단 올려보겠다.


function.h 코드

#pragma once

#pragma warning(disable: 28251)

// api 헤더
#include <windows.h>
#include <winuser.h>
#include <Shlwapi.h>

#define VC_EXTRALEAN 
#define _WIN32_WINDOWS 0x0500

// library
#pragma comment(lib, "dxva2")
#pragma comment(lib, "user32")
#pragma comment(lib, "Shlwapi.lib")

// 모니터 vcp 관련 헤더
#include <lowlevelmonitorconfigurationapi.h>
#include <PhysicalMonitorEnumerationAPI.h>
#include <HighLevelMonitorConfigurationAPI.h>

// c++ 헤더
#include <iostream>
#include <fstream>
#include <string>
#include <vector>
#include "json/json.h"

using namespace std;


// 구조체
typedef struct _MONITORPARAM
{
    LPCWSTR szPhysicalMonitorDescription;
    BYTE VCPcode;
    int source;
    BOOL bPowerOn;
    int curVal;
} MONITOR_PARAM, * PMONITOR_PARAM;

typedef struct _GETMONITORINFO
{
    LPCWSTR szPrimaryMonitorDescription;
    LPCWSTR szSecondMonitorDescription;
    int curVal;
    int curVal_second;
} GET_MONITOR_INFO, * GET_PMONITOR_INFO;


// 얘를 모니터 개수만큼 포인터 배열로 만들어서 _getCurrentValue에 전달하면, 모니터 돌면서 정보를 채워줌.
typedef struct _MONITOR{
    int num;
    char * monName;
    BYTE vcpValue;
} MONITOR, * PMONITOR;


// test 함수
VOID test_setInputSource(HWND, DWORD);
VOID test_getPrimaryMonitor(HWND);
VOID test_setInputSource(HWND, DWORD);
VOID test_SetMonitorPower(LPCWSTR, BOOL);

// interface 함수
VOID ChangeMonitorInput_hwan(PMONITOR mon, int monNum);
VOID GetMonitorInfo_hwan(PMONITOR mon, int monNum);

// callback 함수
BOOL CALLBACK MonitorEnumProc(HMONITOR, HDC, LPRECT, LPARAM);
BOOL CALLBACK _getCurrentValue(HMONITOR, HDC, LPRECT, LPARAM); // 얘가 모니터 정보 얻어와줌
BOOL CALLBACK _setMonitorInput(HMONITOR, HDC, LPRECT, LPARAM); // 얘는 특정 모니터에 value값 넣어줌.

// json 함수
void load_json(LPCWSTR file_path, PMONITOR mon, int monNum);
void save_json(LPCWSTR file_path, int monNum, Json::Value *monitor);


main.cpp 코드

#include "function.h"

#define BTN_SET 111
#define BTN_SAVE 112
#define EDIT_INFO 11
#define EDIT_INPUTNAME 21
#define EDIT_INPUTNUM 31
#define BTN_CLEAR 0

LRESULT CALLBACK WndProc(HWND, UINT, WPARAM, LPARAM);

HINSTANCE g_Inst;
LPCWSTR lpszClass = TEXT("Change Monitor");

static BOOL mode; 
static TCHAR str_filename[1024];

int APIENTRY WinMain(HINSTANCE hInstance, HINSTANCE hPrevInstance, LPSTR lpszClassParam, int nCmdShow)
{
    HWND hWnd;
    MSG Message;
    WNDCLASS WndClass;
    g_Inst = hInstance;
    TCHAR str_currentPath[1024];

    GetCurrentDirectory(1024, str_currentPath);
    wsprintf(str_filename, L"%s\\%s", str_currentPath, L"vcp.json");

    if (PathFileExists(str_filename)) {
        mode = TRUE;
    }
    else {
        mode = FALSE;
    }

    WndClass.cbClsExtra = 0;
    WndClass.cbWndExtra = 0;
    WndClass.hbrBackground = (HBRUSH)GetStockObject(WHITE_BRUSH);
    WndClass.hCursor = LoadCursor(NULL, IDC_ARROW);
    WndClass.hIcon = LoadIcon(NULL, IDI_APPLICATION);
    WndClass.hInstance = hInstance;
    WndClass.lpfnWndProc = WndProc;
    WndClass.lpszClassName = lpszClass;
    WndClass.lpszMenuName = NULL;
    WndClass.style = CS_HREDRAW | CS_VREDRAW;

    RegisterClass(&WndClass);

    hWnd = CreateWindow(lpszClass, lpszClass, WS_OVERLAPPEDWINDOW
        , CW_USEDEFAULT, CW_USEDEFAULT, 500, 300
        , NULL, (HMENU)NULL, hInstance, NULL);
    
    if(!mode) ShowWindow(hWnd, nCmdShow);

    while (GetMessage(&Message, NULL, 0, 0))
    {
        TranslateMessage(&Message);
        DispatchMessage(&Message);
    }
    return (int)Message.wParam;
}


LRESULT CALLBACK WndProc(HWND hWnd, UINT iMessage, WPARAM wParam, LPARAM lParam)
{
    static HWND hEdit_name, hEdit_num, btn_set, btn_save;
    static HWND hEdit_monitorNum;
    static HWND *hEdit_Monitor, *hEdit_inputName, *hEdit_inputNum;
    static int monNum;
    static PMONITOR mon;
    
    char str_monNum[1024], str_name[1024], str_num[1024];
    
    switch (iMessage)
    {
    case WM_CREATE:
        monNum = GetSystemMetrics(SM_CMONITORS);

        mon = (PMONITOR) malloc(sizeof(MONITOR) * monNum);
        for (int i = 0; i < monNum; i++) {
            mon[i].num = 0;
            mon[i].monName = new char[1024];
            mon[i].vcpValue = 0;
        }

        if (mode) {
            load_json(str_filename, mon, monNum);
            ChangeMonitorInput_hwan(mon, monNum);

            DestroyWindow(hWnd);
        }
        else {
            hEdit_Monitor = (HWND *)malloc(sizeof(HWND) * monNum);
            hEdit_inputName = (HWND *)malloc(sizeof(HWND) * monNum);
            hEdit_inputNum = (HWND *)malloc(sizeof(HWND) * monNum);

            for (int i = 0; i < monNum; i++) {
                hEdit_Monitor[i] = CreateWindow(L"edit", NULL, WS_CHILD | WS_VISIBLE | WS_BORDER | ES_READONLY, 20, 10 + (i * 30), 300, 25, hWnd, (HMENU)(EDIT_INFO + i), g_Inst, NULL);
                hEdit_inputName[i] = CreateWindow(L"edit", NULL, WS_CHILD | WS_VISIBLE | WS_BORDER | ES_AUTOHSCROLL, 20, (10 + (monNum * 30)) + (i * 30), 145, 25, hWnd, (HMENU)(EDIT_INPUTNAME + i), g_Inst, NULL);
                hEdit_inputNum[i] = CreateWindow(L"edit", NULL, WS_CHILD | WS_VISIBLE | WS_BORDER | ES_AUTOHSCROLL, 175, (10 + (monNum * 30)) + (i * 30), 145, 25, hWnd, (HMENU)(EDIT_INPUTNUM + i), g_Inst, NULL);
            }
            
            btn_set = CreateWindow(L"button", L"Set", WS_CHILD | WS_VISIBLE | BS_PUSHBUTTON, 330, 10, 60, 25, hWnd, (HMENU)BTN_SET, g_Inst, NULL);
            btn_save = CreateWindow(L"button", L"Save", WS_CHILD | WS_VISIBLE | BS_PUSHBUTTON, 400, 10, 60, 25, hWnd, (HMENU)BTN_SAVE, g_Inst, NULL);

            // get monitor info
            GetMonitorInfo_hwan(mon, monNum);

            // set monitor info
            for (int i = 0; i < monNum; i++) {
                SetWindowTextA(hEdit_Monitor[i], mon[i].monName);
            }
        }
        break;

    case WM_COMMAND:
        switch (LOWORD(wParam)) {
        case BTN_SET:
            for (int i = 0; i < monNum; i++) {
                GetWindowTextA(hEdit_inputName[i], str_name, 1024);
                GetWindowTextA(hEdit_inputNum[i], str_num, 1024);

                MONITOR tmp_mon;
                tmp_mon.monName = new char[1024];
                wsprintfA(tmp_mon.monName, "%s", str_name);
                tmp_mon.vcpValue = atoi(str_num);

                ChangeMonitorInput_hwan(&tmp_mon, 1);

                delete tmp_mon.monName;
            }
            break;

        case BTN_SAVE:
            Json::Value valueMon[3];
            
            for (int i = 0; i < monNum; i++) {
                GetWindowTextA(hEdit_inputName[i], str_name, 1024);
                GetWindowTextA(hEdit_inputNum[i], str_num, 1024);

                valueMon[i]["name"] = str_name;
                valueMon[i]["value"] = atoi(str_num);
            }

            save_json(str_filename, monNum, valueMon);
            break;
        }
        break;

    case WM_PAINT:
        break;

    case WM_DESTROY:
        for (int i = 0; i < monNum; i++) {
            delete mon[i].monName;
        }

        free(mon);
        
        free(hEdit_Monitor);
        free(hEdit_inputName);
        free(hEdit_inputNum);

        PostQuitMessage(0);
        return 0;
    }

    return DefWindowProc(hWnd, iMessage, wParam, lParam);
}


function.cpp 코드

#include "function.h"


VOID ChangeMonitorInput_hwan(PMONITOR mon, int monNum)
{
    MONITOR tmp_mon;

    for (int i = 0; i < monNum; i++) {
        tmp_mon.monName = mon[i].monName;
        tmp_mon.vcpValue = mon[i].vcpValue;

        EnumDisplayMonitors(NULL, NULL, _setMonitorInput, (LPARAM)&tmp_mon);
    }
}


VOID GetMonitorInfo_hwan(PMONITOR mon, int monNum)
{
    MONITOR tmp_mon;

    for (int i = 0; i < monNum; i++) {
        tmp_mon.num = i;
        tmp_mon.monName = new char[1024];
        tmp_mon.vcpValue = -1;

        EnumDisplayMonitors(NULL, NULL, _getCurrentValue, (LPARAM)&tmp_mon);

        wsprintfA(mon[i].monName, "%s", tmp_mon.monName);
        mon[i].vcpValue = tmp_mon.vcpValue;

        delete tmp_mon.monName;
    }
}

BOOL CALLBACK _getCurrentValue(HMONITOR hMonitor, HDC hdcMonitor, LPRECT lprcMonitor, LPARAM dwDate) {
    DWORD dwMonitorCapabilities = 0;
    DWORD dwSupportedColorTemperatures = 0;
    DWORD dwMonitorCount;
    DWORD curVal = -1;

    int len;
    char strMultibyte[1024];

    if (GetNumberOfPhysicalMonitorsFromHMONITOR(hMonitor, &dwMonitorCount))
    {
        PHYSICAL_MONITOR* pMons;
        if (pMons = (PHYSICAL_MONITOR*)HeapAlloc(GetProcessHeap(), 0, sizeof(PHYSICAL_MONITOR) * dwMonitorCount))
        {
            if (GetPhysicalMonitorsFromHMONITOR(hMonitor, dwMonitorCount, pMons))
            {
                for (int i = 0; i < dwMonitorCount; i++)
                {
                    if (((PMONITOR)dwDate)->num == i) {
                        GetVCPFeatureAndVCPFeatureReply(pMons[i].hPhysicalMonitor, 0x60, NULL, &curVal, NULL);

                        len = WideCharToMultiByte(CP_ACP, 0, pMons[i].szPhysicalMonitorDescription, -1, NULL, 0, NULL, NULL);
                        WideCharToMultiByte(CP_ACP, 0, pMons[i].szPhysicalMonitorDescription, -1, strMultibyte, len, NULL, NULL);

                        wsprintfA(((PMONITOR)dwDate)->monName, "%s", strMultibyte);
                        ((PMONITOR)dwDate)->vcpValue = curVal;

                        DestroyPhysicalMonitor(pMons[i].hPhysicalMonitor);

                        break;
                    }
                }
            }

            HeapFree(GetProcessHeap(), 0, pMons);
        }
    }

    return TRUE;
}


BOOL CALLBACK _setMonitorInput(HMONITOR hMonitor, HDC hdcMonitor, LPRECT lprcMonitor, LPARAM dwDate) {
    DWORD dwMonitorCapabilities = 0;
    DWORD dwSupportedColorTemperatures = 0;
    DWORD dwMonitorCount;
    DWORD curVal = -1;

    if (GetNumberOfPhysicalMonitorsFromHMONITOR(hMonitor, &dwMonitorCount))
    {
        PHYSICAL_MONITOR* pMons;
        if (pMons = (PHYSICAL_MONITOR*)HeapAlloc(GetProcessHeap(), 0, sizeof(PHYSICAL_MONITOR) * dwMonitorCount))
        {
            if (GetPhysicalMonitorsFromHMONITOR(hMonitor, dwMonitorCount, pMons))
            {
                int len;
                char str_tmp[1024];
                char strMultibyte[1024];

                for (int i = 0; i < dwMonitorCount; i++) 
                {
                    len = WideCharToMultiByte(CP_ACP, 0, pMons[i].szPhysicalMonitorDescription, -1, NULL, 0, NULL, NULL);
                    WideCharToMultiByte(CP_ACP, 0, pMons[i].szPhysicalMonitorDescription, -1, strMultibyte, len, NULL, NULL);

                    if (strcmp(((PMONITOR)dwDate)->monName, strMultibyte) == 0) {
                        GetVCPFeatureAndVCPFeatureReply(pMons[i].hPhysicalMonitor, 0x60, NULL, &curVal, NULL);

                        if (curVal != -1)
                            SetVCPFeature(pMons[i].hPhysicalMonitor, 0x60, ((PMONITOR)dwDate)->vcpValue);
                    }

                    DestroyPhysicalMonitor(pMons[i].hPhysicalMonitor);
                }
            }

            HeapFree(GetProcessHeap(), 0, pMons);
        }
    }

    return TRUE;
}


void load_json(LPCWSTR file_path, PMONITOR mon, int monNum) {
    bool parsingSuccessful;

    Json::CharReaderBuilder builder;
    Json::CharReader* reader = builder.newCharReader();
    Json::Value root;
    string errors, text = "", line;

    ifstream jsonFile(file_path);
    if (jsonFile.is_open()) {
        
        while (getline(jsonFile, line)) {
            text += line;
        }

        jsonFile.close();
    }

    parsingSuccessful = reader->parse(text.c_str(), text.c_str() + text.size(), &root, &errors);
    delete reader;

    size_t rv = 0;
    for (Json::Value::const_iterator outer = root.begin(); outer != root.end(); outer++)
    {
        for (Json::Value::const_iterator inner = (*outer).begin(); inner != (*outer).end(); inner++)
        {
            for (int i = 0; i < monNum; i++) {
                if (outer.key().asString() == "monitor_" + to_string(i)) {
                    if (inner.key().asString() == "name") wsprintfA(mon[i].monName, "%s", inner->asCString());
                    if (inner.key().asString() == "value") mon[i].vcpValue = stoi(inner->asString());
                }
            }

        }
    }
}


void save_json(LPCWSTR file_path, int monNum, Json::Value *monitor) {
    Json::Value root;

    Json::Value MON;
    string key = "";

    for (int j = 0; j < monNum; j++) {
        key = "monitor_" + to_string(j);
        MON[key] = monitor[j];
    }

    root = MON;

    Json::StreamWriterBuilder writer;

    string str = Json::writeString(writer, root);

    ofstream write_JsonFile;
    write_JsonFile.open(file_path);
    if (write_JsonFile.is_open()) {
        write_JsonFile.write(str.c_str(), str.length());
    }

    write_JsonFile.close();
}


프로그램 설명

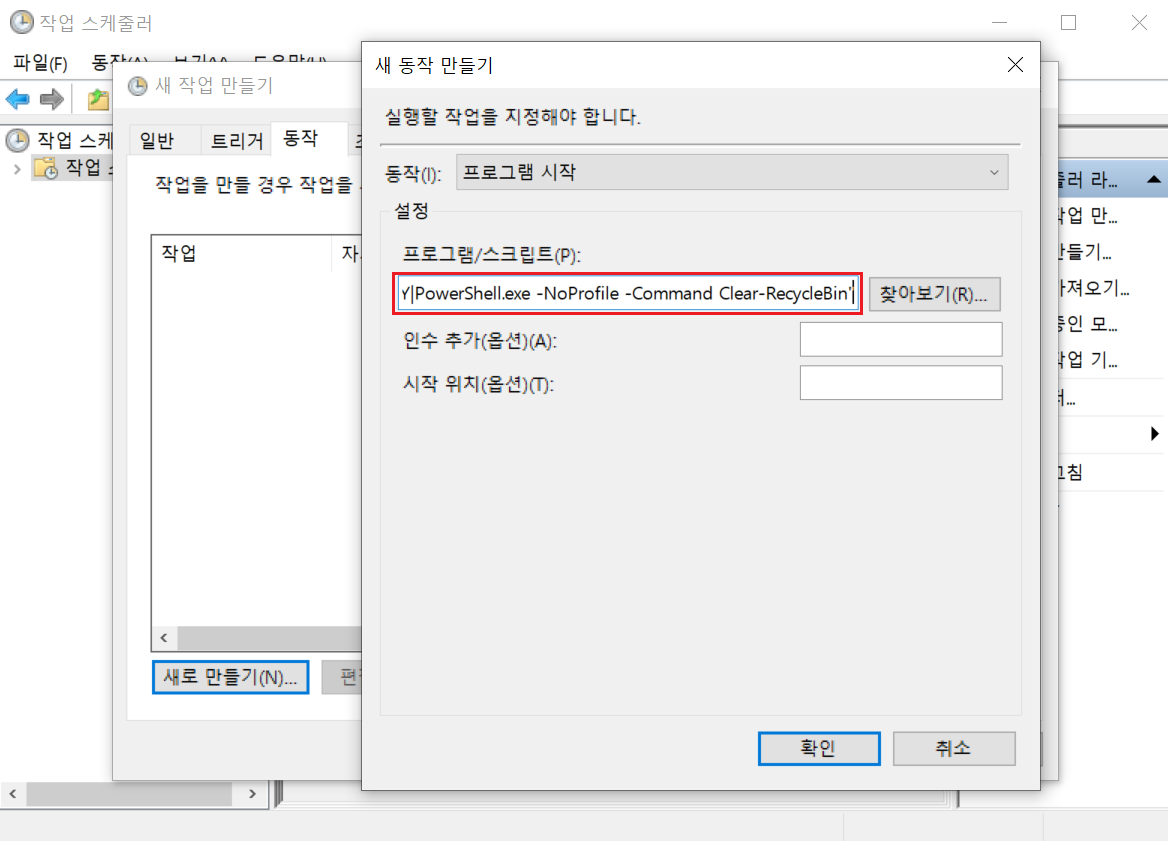
 프로그램을 시작할 때 동일 경로 상의 vcp.json 파일 존재를 기준으로 mode를 정하는데, 해당 mode가 활성화 되어 있을 경우 UI는 나타나지 않고 vcp.json에 정의된 대상으로 변경만 수행한 뒤 프로그램을 종료한다.
(최초에 한번 값을 넣어두면 다음부턴 실행했을 경우 모니터가 원하는 대상으로 변경된다. 개인적으로는 아래 작업 표시줄에 바로가기를 등록해두고 필요할때 눌러서 사용했다.)

여기에 등록해서 누르면 모니터가 바뀜


아래는 최초 실행 시 나오는 프로그램의 UI이다.

최초 실행 시 UI


현재는 연결된 모니터가 없어 노트북의 내장 모니터인 Generic PnP Monitor만 나오지만 다른 모니터가 연결되어 있을 경우, Dell H00000 (DP) 와 같은 식으로 모니터의 이름이 나온다.
(제대로 나오지 않을 경우 장치 관리자의 모니터 탭에서 확인할 수 있다.)

참고로 이 부분이 모니터 개수만큼 아래로 늘어난다.


프로그램에서는 해당 문자열을 1번에 입력하여 여러개의 모니터들 중 변경을 원하는 대상을 구분할 수 있고 2번에는 연결된 케이블의 Value을 입력하여 원하는 케이블을 선택할 수 있다.

입력 후 Set 버튼을 누르면 모니터가 변경되고, Save를 누르면 동일 경로에 입력된 값으로 vcp.json 파일이 생성된다
이후 프로그램을 종료하면 실행 시 마다 vcp.json 내의 값을 기준으로 모니터가 변경된다.
만약 값 변경을 원하면 vcp.json을 직접 수정하거나 파일을 삭제하고 프로그램을 재실행해서 입력해주면 된다.

추가로 Value를 구하는 방법이 궁금하면 위의 GetVCPFeatureAndVCPFeatureReply() 함수를 잘 활용해서 구해보기 바란다..
(만약 귀찮으면 1부터 Max까지 값을 직접 넣어보면서 바뀌는 값을 찾는 방법도 있다.)


결과 및 느낀점

 회사에 다니면서 주말 프로젝트로 간단하게 생각하고 진행했었는데, 자료를 찾다보니 점점 내용이 많아졌다.

어쨋든 기능적으로 나름 잘 돌아가는 프로그램을 만들었고 회사에서도 잘 사용을 하고 있기 때문에 마무리는 했지만, 중간에 작성했던 유용한 테스트 함수들이 계속 수정되면서 사라져 추가하지 못한 기능들이 많아 아쉬운 점이 많다. (Value 찾아주는 함수 등)

나중에 좀 더 기능을 추가해서 깔끔하게 업그레이드된 프로그램을 만들면 좋을 것 같다.

추가로 ddcutil? 라이브러리를 사용하면 dll을 통해 더 정리가 잘된 함수들을 사용할 수 있고 커맨드 형식으로도 제공이 되는 것 같다. (API로 삽질하지 말고 라이브러리 사용하면 편하다..)
https://www.ddcutil.com/


ddcutil Documentation

ddcutil and ddcui Announcements 05 August 2022 ddcui release 0.3.0 contains the following changes of interest to general users; CTL-Q terminates ddcui (does not apply within dialog boxes) Errors opening /dev/i2c and /dev/usb/hiddev devices are reported usi

www.ddcutil.com


그리고 전부는 아니지만 모니터 제조사와 모델별 특성과 값을 적어둔 페이지도 찾았다.
https://www.ddcutil.com/monitor_notes/


Notes on Specific Monitors - ddcutil Documentation

The following list describes some monitors that have been tested or reported by users. It highlights the variability in DDC implementation among monitors. VCP Version: 2.2 Controller Manufacturer: Mstar Controller Model: mh=0xff, ml=0x16, sh=0x00 Firmware

www.ddcutil.com


실행 파일은 깃허브에 올려두었다.

https://github.com/hwan001/Change_monitor_input


GitHub - hwan001/Change_monitor_input: 모니터 화면 전환 프로그램

모니터 화면 전환 프로그램. Contribute to hwan001/Change_monitor_input development by creating an account on GitHub.

github.com


728x90
반응형
728x90
반응형

Paramiko

 원격 장치에 대한 보안 연결을 위한 모듈로 SSH/ SFTP 연결 시에 사용한다.

만약 설치 중 에러 발생 시 pip를 업그레이드하고 의존성이 있는 라이브러리를 설치해준다.


코드

pip install paramiko


# requirements.txt - paramiko
import sys
import subprocess

try:
    import paramiko

except:
    subprocess.check_call([sys.executable,'-m', 'pip', 'install', '--upgrade', 'pip'])
    subprocess.check_call([sys.executable,'-m', 'pip', 'install', '-r', 'requirements.txt'])

	import paramiko


def command_exec(ip, port, user, pw, cmds):
	ssh = paramiko.SSHClient()
	ssh.set_missing_host_key_policy(paramiko.AutoAddPolicy)
	ssh.connect(ip, port, user, pw)

	stdin, stdout, stderr = ssh.exec_command(";".join(cmds))

	lines = stdout.read()
	res = ''.join(str(lines))

	return res
    
    
if __name__ == "__main__":
	cmds = ["whoami", "echo hello", "reboot"]
	command_exec("123.123.123.123", 22, "user", "1234", cmds)


후기

 기능은 잘 동작하지만 여러줄의 명령어를 실행하거나 세션을 유지하여 터미널 처럼 사용하기 어려운 것 같다.(방법을 찾아보고는 있음) 현재는 join 함수로 명령어들을 ;로 묶어 한번에 서버에서 실행시키도록 함수를 작성하였다.


728x90
반응형
728x90
반응형


MSDN

https://docs.microsoft.com/en-us/windows/win32/api/winbase/nf-winbase-getcurrentdirectory


GetCurrentDirectory function (winbase.h) - Win32 apps

Retrieves the current directory for the current process.

docs.microsoft.com


Header

#include <windows.h>


Syntax

DWORD GetCurrentDirectory(
  [in]  DWORD  nBufferLength,
  [out] LPTSTR lpBuffer
);
  • Parameters
    - [in] DWORD nBufferLength : NULL을 포함한 문자열 변수의 길이
    - [out] LPTSTR lpBuffer : 현재 디렉토리 문자열을 받을 변수 ( ex) TCHAR )

  • Return Value
    DWORD : NULL을 제외하고 버퍼에 기록되는 문자 수, 실패시 0 반환 ( 자세한 에러는 GetLastError )


Example

#include <windows.h>

int main()
{
	TCHAR str_currentPath[1024];
    
	GetCurrentDirectory(1024, str_currentPath);
}


728x90
반응형
728x90
반응형


MSDN

https://docs.microsoft.com/en-us/windows/win32/api/shlwapi/nf-shlwapi-pathfileexistsa


PathFileExistsA function (shlwapi.h) - Win32 apps

Determines whether a path to a file system object such as a file or folder is valid.

docs.microsoft.com


Header

#include <Shlwapi.h>

#pragma comment(lib, "Shlwapi.lib")


Syntax

BOOL PathFileExistsA(
  [in] LPCSTR pszPath
);
  • Parameters
    - 파일의 절대 경로를 LPCTSTR 타입으로 넣어줌. ( ex) L"C:\Users\hwan\Desktop\test.exe" )


  • Return value
    - 파일이 존재할 경우 True, 존재하지 않은 경우 False

728x90
반응형
728x90
반응형

명령어로 휴지통 비우기

아래 명령어를 활용하면 파워쉘로 휴지통을 비울 수 있다. 

PowerShell.exe -NoProfile -Command Clear-RecycleBin


만약 cmd에서 지우고 싶다면 아래처럼 활용이 가능하다.

cmd.exe /c "echo Y|PowerShell.exe -NoProfile -Command Clear-RecycleBin"


윈도우 작업 스케줄러 활용하기

위 명령어들을 정해진 날짜, 시간, 조건 등에 자동으로 시행하기위해 윈도우 작업 스케줄러를 사용했다.


작업 스케줄러를 열어준 뒤 새 작업을 만들어준다.

이름, 설명 지정


트리거 탭으로 이동해 새로만들기 버튼을 눌러주면, 작업이 수행되는 조건(트리거)를 지정할 수있다.

매일 18시에 자동으로 실행되게 설정해 주었다.

트리거 만들기


동작 탭으로 이동해서 위의 코드를 프로그램/스크립트에 붙여넣기 해주고 확인을 누른다.

새 동작 만들기


확인을 누르면 아래와 같은 팝업이 나오는데 그냥 예(Y) 버튼을 눌러주면 된다.


마지막으로 확인을 눌러 등록하면, 이제부터 매일 18시에 휴지통이 자동으로 비워진다.

혹시 잘 동작하는지 확인하고 싶다면 등록된 스케줄을 우클릭하면 직접 실행해볼 수 있다.

728x90
반응형

'프로그래밍 > Shell Script' 카테고리의 다른 글

[Script] 쉘 스크립트 모음  (0) 2022.09.01
[PowerShell] File_Share.ps1  (0) 2021.10.10
[PowerShell] 파워쉘 사용법 정리  (0) 2021.09.22
728x90
반응형

CallBack 함수

 함수는 일반적으로 프로그래머에 의해 작성되고 호출된다. 

CallBack 함수는 일반적인 함수와 비슷하지만, 호출되는 시점이 시스템(이벤트)에 의해 결정된다는 차이가 있다.


윈도우 API를 공부하면 가장 처음 배우는 Window를 띄우는 코드(링크)에서도 콜백 함수인 윈도우 프로시져를 볼 수 있는데, 해당 콜백함수(프로시져)는 WinMain에서 WndClass.lpfnWndProc=WndProc; 로 WNDCLASS 구조체에 등록된 뒤에 RegisterClass(&WndClass); 되어진 이후 따로 호출하지 않는다.


하지만 구조체의 정보가 등록된 이후는 WinMain 내부의 메시지 루프인

while(GetMessage(&Message, NULL, 0, 0))
{
        TranslateMessage(&Message);
        DispatchMessage(&Message);
}

부분을 통해 윈도우의 메시지 큐에서 GetMessage로 가져오고, TranslateMessage를 사용해 가상 키 메시지를 문자 메시지로 변환한 뒤 DispatchMessage를 통해서 연결된 콜백 함수(프로시져)에 전달한다.


728x90
반응형

+ Recent posts