JWT는 웹 표준(RFC 7519) 으로 두 개체 사이에서 JSON을 사용하여 정보를 안전성 있게 전달해준다.
웹에서 로그인을 하거나 인증을 받게되면 보통 세션을 사용하여 인증 정보를 기록하는데, JWT는 토큰 내부의 Signature에 해당 정보를 기록한다. JWT를 사용할 경우 인증을 위해 웹 브라우저의 세션 공간을 사용하지 않고 인증 여부를 알 수 있기 때문에 확장성이 좋다. 또한 생성 시 권한을 지정할 수 있어 각 토큰별로 기능을 제어할 수 있고 플랫폼에 종속적이지 않다.
JWT의 구조는 Header.Payload.Signature로 나뉘어져 있다. Header는 토큰의 typ(해당 토큰의 타입)과 alg(해싱 알고리즘)을 Payload는 토큰에 담을 정보를 그리고 마지막 Signature는 Header와 Paylaod의 Base64 인코딩 값을 시크릿 키와 함께 다시 한번 해싱한 후 인코딩한 값을 가진다.
파이썬의 PyJWT 패키지를 사용해서 직접 토큰을 만들고 검증해보자.
구현
파이썬에서의 jwt 사용은 아래처럼 PyJWT를 설치하거나 requirements.txt에 작성해두고 사용할 수 있다.
# requirements.txt : requests_html, yahoo_fin 추가

import sys
import subprocess

try:
    from yahoo_fin.stock_info import *

except:
    subprocess.check_call([sys.executable, '-m', 'pip', 'install', '--upgrade', 'pip'])
    subprocess.check_call([sys.executable, '-m', 'pip', 'install', '-r', 'requirements.txt'])

    from yahoo_fin.stock_info import *


if __name__ == '__main__':
    ticker = "JEPI"

    if ticker in tickers_dow():
        print("dow")
    if ticker in tickers_other():
        print("other")
    if ticker in tickers_sp500():
        print("sp500")
    if ticker in tickers_ftse250():
        print("ftse250")
    if ticker in tickers_ftse100():
        print("ftse100")
    if ticker in tickers_ibovespa():
        print("ibovespa")
    if ticker in tickers_nasdaq():
        print("nasdaq")

    print(get_data(ticker))
후기
yfinance, FinanceDataReader 등을 사용봤지만 전체 티커의 목록을 얻어오거나 실시간 데이터를 얻기엔 불편한 점이 있었다. yahoo_fin에선 여러 소스에서 스크랩과 api를 활용하여 데이터를 받아오기 때문에 실시간 데이터와 전체 목록을 얻어오는 기능이 필요하다면 유용하게 사용할 수 있다. 하지만 내부 코드를 보면 위키피디아 등에서도 데이터를 스크랩해오는데.. 누구나 수정할 수 있는 위키피디아의 특성 상 항상 신뢰하긴 어려울 수도 있을 것 같다.
# Case 1. lambda 함수 정의 후 매개변수 전달
function_lambda = lambda x : x + 1
print("result : ", function_lambda(1))
# result : 2

# Case 2. 한번에 매개변수 전달
print("result : ", (lambda x : x + 1)(1))
# result : 2

# Case 3. 외부 변수 활용
y = 1
print("result : ", (lambda x : x + y)(1))
# result : 2

# Case 4. 여러개의 매개변수 전달
print("result : ", (lambda x, y : x + y)(1, 1))
# result : 2

# Case 5. max 함수의 매개 변수로 사용
print(max((lambda x : [i for i in range(1, x+1)])(10)))
# 10
yfinance, yahoo_fin 등의 Python 라이브러리로 시장 정보를 받아와 작성된 알고리즘을 테스트한다.
Ticker 별로 적합한 형태의 트레이딩 알고리즘을 개발하여 시뮬레이션해본다.
최적/최고 수익을 내는 파리미터와 알고리즘, 티커를 찾아내어 실거래에 적용한다.
알고리즘
존버, 물타기
기본적인 알고리즘의 전체 구조는 투자시 일반적으로 사용되는 존버(대기)와 물타기(추가 매수) 등을 기반으로 시작했다.
처음 작성된 알고리즘은 거래 시작 시점부터 현재까지 누적된 비율을 계산하여 미리 입력해둔 특정 값에 맞춰졌을 경우 매도 또는 매수를 판단하여 알려준다. 예를들면 아래 코드에서는 '변화심한그래프.거래행동판단()' 함수가 해당 기능을 담당하며 현재 티커의 주가를 입력받으면 클래스 내부에 저장된 이전 기록과 비율을 읽고 계산하여 대기(0), 매수(+a), 매도(-)를 결정해준다.
소스 코드
hwan_yfinance_module.py
from abc import *
import matplotlib.pyplot as plt
import yfinance as yf
from datetime import *
from datetime import timedelta


class yfinanace_Main(metaclass=ABCMeta):
    @abstractmethod
    def 현재가치판단(self, Ticker):
        pass

    @abstractmethod
    def Date_Save(self):
        pass

    @abstractmethod
    def Data_Load(self):
        pass


# 상승장 형태에서 변화가 비교적 심한 종목일 경우 적용
class 변화심한그래프(yfinanace_Main):
    # 초기 값 지정
    def __init__(self):
        self.int_보유주식수 = 0
        self.int_전일가 = 0
        self.dou_누적률 = 0.0
        self.dou_전일기준등락률 = 0
        self.dou_고정비율 = 20.0 # 주식 종목별 변경 필요

    # set
    def set_int_보유수량(self, int_보유주식수):
        self.int_보유주식수 = int_보유주식수
    def set_dou_누적률(self, dou_누적률):
        self.dou_누적률 = dou_누적률
    def set_int_보유수량(self, int_보유주식수):
        self.int_보유주식수 = int_보유주식수
    def set_int_전일가(self, int_전일가):
        self.int_전일가 = int_전일가

    def 내부변수_보여주기(self):
        print("현재 보유수량 : ", self.int_보유주식수, ", 누적률 : ", self.dou_누적률,
                        ", 전일가 : ", self.int_전일가)

    # 현재 시세를 입력받아 매수, 매도, 대기 를 판단해서 알려주는 함수
    def 거래행동판단(self, int_주가):
        # ex) 현재 주가가 8000원, 전일 가격이 10000원이면 전일기준 등락률은 -20% (-2000 / 10000 * 100)가 됨
        self.dou_전일기준등락률 = ((int_주가-self.int_전일가)/self.int_전일가) * 100

        # 전일 등략률을 누적함
        self.dou_누적률 = self.dou_누적률 + self.dou_전일기준등락률

        # 내부 변수 현황 출력
        #print("현재가 : "+ str(int_주가) +", 전일가 대비 등락률 :" + str(dou_전일기준등락률))
        #self.내부변수_보여주기()

        # 누적률이 고정비율 이상인 경우 전량 매도 후 공통 변수 초기화
        if self.dou_누적률 >= self.dou_고정비율:
            int_행동 = -1 * self.int_보유주식수
            self.dou_누적률 = 0.0
            self.int_보유주식수 = self.int_보유주식수 + int_행동

        # 누적률이 -20%(-고정비율) 이하인 경우, 현재 누적률을 보유 주식수에 곱한 수 만큼 추가 매수
        elif self.dou_누적률 <= -1 * self.dou_고정비율:
            int_행동 = int(self.int_보유주식수 * ((self.dou_누적률/100) * -1))
            self.set_int_보유수량(self.int_보유주식수+int_행동)

        # 누적률이 +고정비율과 -고정비율 사이일 경우(20% ~ -20%) 행동은 없음
        else:
            int_행동 = 0

        # 결정된 행동을 반환
        return int_행동

    def 현재가치판단(self, Ticker):
        print("미구현 동작입니다.")

    def Date_Save():
        print("미구현 동작입니다.")

    def Data_Load():
        print("미구현 동작입니다.")


def Simulate_변화심한그래프(str_ticker, str_startdate):
    #str_ticker = "GOOGL"
    #str_startdate = "2021-03-01"
    str_enddate = datetime.now()

    yf_Ticker = yf.Ticker(str_ticker) #AAPL, TSLA, GOOGL
    close_TickerData = yf_Ticker.history(start=str_startdate, end=str_enddate, interval="1d")['Close']

    int_최초구매수량 = 10 # 주식 종목별 최적화 필요 변수
    dou_시작주가 = close_TickerData[0]
    dou_최초투자금 = int_최초구매수량 * dou_시작주가

    # class set
    f = 변화심한그래프()
    f.set_int_보유수량(int_최초구매수량)
    f.set_int_전일가(dou_시작주가)

    print("\n초기값")
    print("Tiker :" + str_ticker + ", Start : " + str_startdate + ", Now : " + str_enddate.strftime('%Y-%m-%d') )
    f.내부변수_보여주기()
    print("")

    # 입력 기준 7일 단위로 값 가져오기
    list_7일단위값 = []
    for i in range(1, len(close_TickerData)):
        if i%7 == 0:
            list_7일단위값.append(close_TickerData[i])

    # 시작
    cnt = 1
    int_전체추가투자금액 = 0

    # 시뮬레이션 Start
    for int_현재주가 in list_7일단위값:
        int_행동 = f.거래행동판단(int_현재주가)

        if int_행동 == 0:
            print(str(cnt) + "회 행동 : 대기")
            print("현재가 : "+ str(int_현재주가) +", 전일가 대비 등락률 :" + str(f.dou_전일기준등락률))
            print("현재 보유수량 : ", f.int_보유주식수, ", 누적률 : ", f.dou_누적률, ", 전일가 : ", f.int_전일가)

        elif int_행동 > 0:
            print(str(cnt) + "회 행동 : ", int_행동, "주 매수 -> 현재보유 주식 수(주) : " + str(f.int_보유주식수) + ", 추가 투자금($) : " + str(int_행동 * int_현재주가))
            int_전체추가투자금액 += (int_행동 * int_현재주가)

        else:
            print(str(cnt) + "회 행동 : 전량매도(", int_행동, "주), 매도 금액($) : " + str(int_행동*int_현재주가*-1))
            print("  투자 기간 : " + str_startdate + " ~ " + (datetime.strptime(str_startdate,"%Y-%m-%d") + timedelta(days=(cnt*7))).strftime('%Y-%m-%d') )
            print("  최초 투자금액 : " + str(dou_최초투자금))
            print("  추가 투자금액 : " + str(int_전체추가투자금액))
            print("  전체 투자금액 : " + str(dou_최초투자금+int_전체추가투자금액))
            print("  손익 : " + str((int_행동*int_현재주가*-1) - (dou_최초투자금 + int_전체추가투자금액)))
            break

        f.set_int_전일가(int_현재주가)
        print("")
        cnt += 1

    # 데이터 셋 그래프
    plt.plot(list_7일단위값)
    plt.show()
make_money.py
#-*- encoding: utf-8 -*_
import hwan_yfinance_Module as my_class

str_startDate = "2020-01-01"
arr_Ticker = ["GOOGL", "AAPL", "TSLA"]

for str_Ticker in arr_Ticker:
    my_class.Simulate_변화심한그래프(str_Ticker, str_startDate)
변화 심한 그래프 시뮬레이션 결과
Alphabet A (Google, Voting)/ 2020-01-01 시작
Google 시뮬레이션 결과 - 티커 : GOOGL - 기간 : 2020-01-01 ~ 2020-06-31 - 투자 : $15502 (최초 $13394 , 추가 $2108) - 손익 : $3413
AAPL(애플)/ 2020-01-01 시작
Apple 시뮬레이션 결과 - 티커 : AAPL - 기간 : 2020-01-01 ~ 2020-04-29 - 투자 : $837 (최초 $726, 추가 $111) - 손익 : $233
TSLA(테슬라) / 2020-01-01 시작
Tesla 시뮬레이션 결과 - 티커 : TSLA - 기간 : 2020-01-01 ~ 2020-01-15 - 투자 : $837 (최초 $837, 추가 $0) - 손익 : $302
리뷰 및 개선 사항
현재 시뮬레이션된 알고리즘은 특정 상황, 특정 조건에서는 수익이 발생하지만,변동성이 적은 종목에서 테스트했을 경우 수익이 나지 않고, 지속적으로 하락된 상황에서는 기하급수적으로 주식을 구매함
실거래 적용은 아직 큰 리스크가 있음
yfinance 라이브러리가 아닌 야후 finance의 개인키를 발급 받아 RestAPI를 직접 사용하는 모듈을 제작하면 더 좋을 듯함
Captcha 이미지를 읽어 내용을 알려주는 신경망 모델을 Python으로 작성하여 UiPath Activity 형태로 만들어준다.
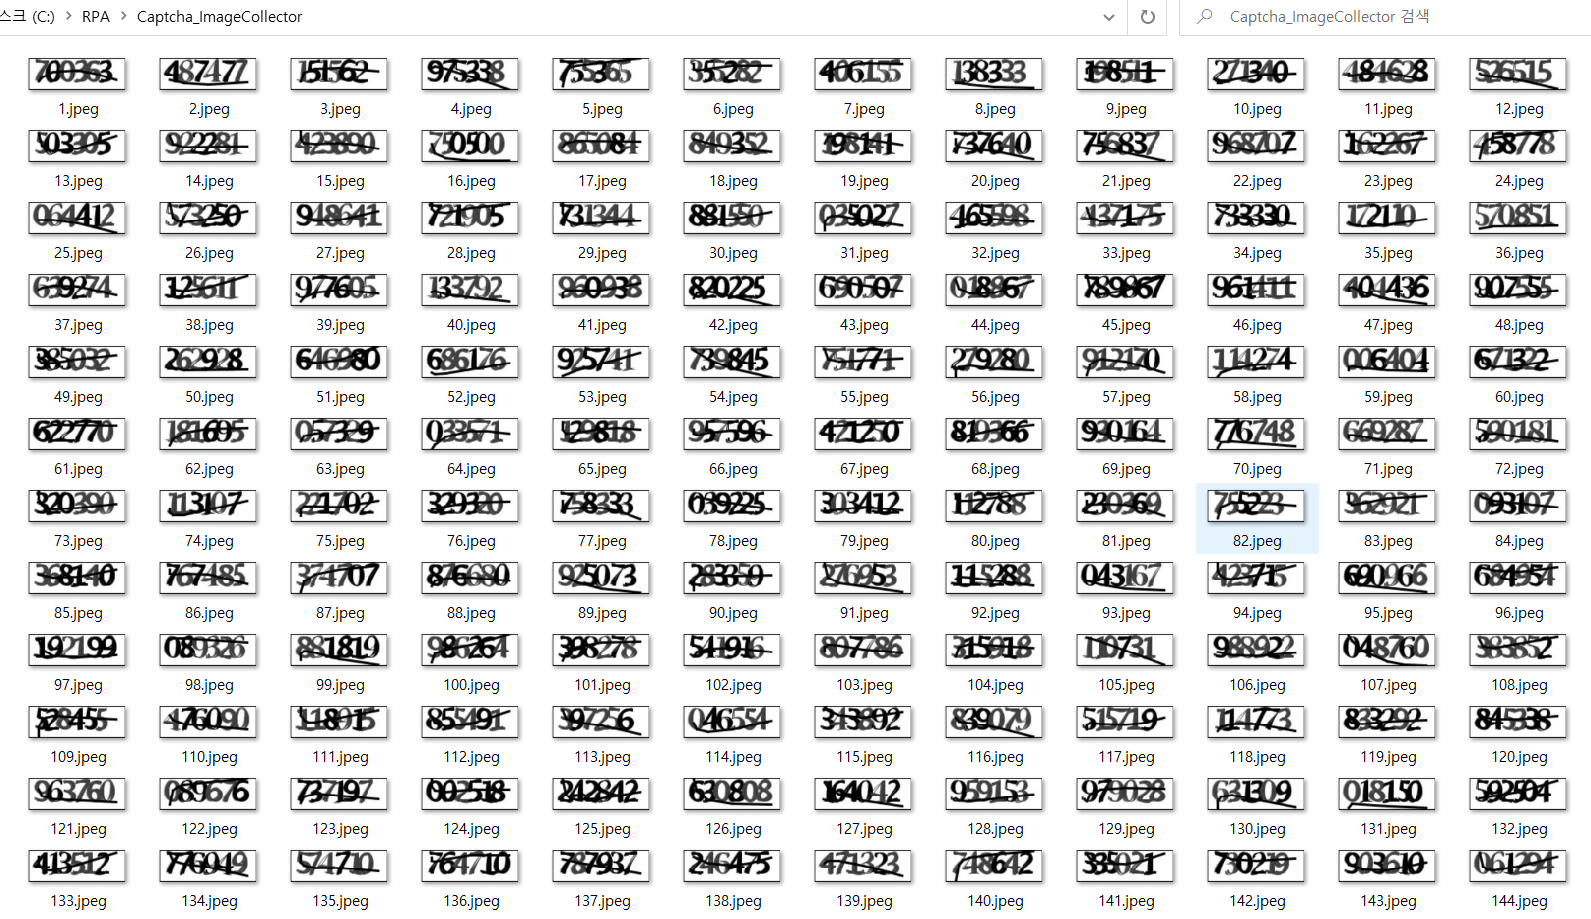
2. Captcha 이미지 수집기 제작
RPA로 제작된 이미지 수집기
3. 이미지 Dataset 만들기
3-1) 폴더 구성
- C:\RPA\Captcha_ImageCollector\origin : 위에서 수집기가 수집한 파일들 위치
- C:\RPA\Captcha_ImageCollector\separate : 분리된 파일들 생성
- C:\RPA\Captcha_ImageCollector\complete : 분리가 완료된 파일 이동
폴더 구성
3-2) 이미지 분리용 코드
import tensorflow as tf
import cv2
import os

import PIL.Image as pimage
import numpy as np
import matplotlib.image as mimage
import matplotlib.pyplot as plt

from tensorflow.keras import datasets, layers, models


# Init Flag
is_Debug = False

# Init global variables
str_path_main = "C:\RPA\Captcha_ImageCollector"
str_path_origin = str_path_main + "\\origin"
str_name_origin = "\\[index].jpeg"
str_file_origin = str_path_origin + str_name_origin
str_path_separate = str_path_main + "\\separate"
str_name_separate = "\\[index].jpeg"
str_file_separate = str_path_separate + str_name_separate
str_path_complete = str_path_main + "\\complete"
str_path_dataset = str_path_main + "\\dataset"
str_path_testset = str_path_main + "\\testset"


# 입력 경로의 파일 수를 반환
def get_current_index(str_path):
    return len(os.listdir(str_path))

# 이미지 Shape를 출력
def print_ImageShape(img, is_debug):
    if is_debug:
        _height, _width, _channel = img.shape
        print("Image Shape : " + str(_height) +", "+ str(_width) + ", " + str(_channel))

# 분리된 이미지를 생성
def Image_Separate(str_originImage):
    # separate 경로 내부의 현재 파일 수를 얻어옴
    int_index = get_current_index(str_path_separate)

    # 이미지 사이즈 변수 초기화
    origin_w = 240 # 6*40
    origin_h = 120 # 6*20
    piece_x = int(origin_w/7)

    # 원본 이미지 불러오기
    img = cv2.imread(str_originImage)
    print_ImageShape(img, is_Debug)

	# 이미지 사이즈 변경 후 테두리 공백 제거
    img = cv2.resize(img, dsize=(origin_w, origin_h)).copy()
    img = img[int(origin_h*0.05):int(origin_h*0.75), int(origin_w*0.05):int(origin_w*0.90)].copy()
    print_ImageShape(img, is_Debug)

    # 이미지 분리
    list_img = []
    img_copy = img.copy()

    for i in range(0, 6):
        list_img.append(img[:, piece_x * i:piece_x * (i+1)])
        if is_Debug:
        	# 디버그 모드일 경우 분리할 경계선을 보라색으로 나타내줌
            result = cv2.rectangle(img_copy, (piece_x * i, 0), (piece_x * i, origin_h), (255, 0, 255), 1)
            print(piece_x * i, ", ",  piece_x*(i+1))

    # 분리된 이미지를 separete 경로에 파일로 출력, 뒤로 이어붙이기
    for i in range(0, 6):
        int_index = int_index + 1
        cv2.imwrite(str_file_separate.replace("[index]", str(int_index)), list_img[i])

        if is_Debug:
            cv2.imshow('img', list_img[i])
            cv2.waitKey(0)

    if is_Debug:
        result = img_copy
        cv2.imshow('result', result)
        cv2.waitKey(0)

        cv2.destroyAllWindows()
    return ;

# Function
def Start_Separate():
    # 한번에 가져올 개수, 아래 코드는 현재 경로에 있는 파일 전부를 의미함
    int_onetime = get_current_index(str_path_origin)

    last_origin_index = get_current_index(str_path_origin)
    last_complete_index = get_current_index(str_path_complete)
    print("origin start count: ", last_origin_index)
    print("complete start count : ", last_complete_index)

    # origin의 마지막 index 파일부터 가져옴 (수집기가 뒤에서부터 추가하기 때문)
    for i in reversed(range(last_origin_index + 1 - int_onetime, last_origin_index + 1)):
        str_ImageFullPath = str_file_origin.replace("[index]" , str(i))
        try:
            print(str_ImageFullPath)

            Image_Separate(str_ImageFullPath)
            print(str_path_complete + "\\" + str(i)+".jpeg")

            last_complete_index += 1
            os.rename(str_ImageFullPath, str_path_complete + "\\" + str(last_complete_index) +".jpeg")
        except:
            print(str_ImageFullPath + " - 파일 없음.")

    last_origin_index = get_current_index(str_path_origin)
    last_complete_index = get_current_index(str_path_complete)
    print("origin end count: ", last_origin_index)
    print("complete end count : ", last_complete_index)

# 분리 시작
Start_Separate()
3-3) 결과
중간 과정 편집
3-4) 이미지 분류
- 이미지 내부의 숫자들 중 괜찮은 이미지를 각 숫자별 폴더로 분류
- 불량한 애들은 수작업으로 버려줌
분류 중인 이미지
4. 학습 모델 제작, 학습, 가중치 파일 생성
-C:\RPA\Captcha_ImageCollector\dataset : 학습 시 사용할 데이터들, 폴더 별로 분류된 이미지들이 위치
-C:\RPA\Captcha_ImageCollector\testset : 학습 완료 후 정확도를 검증하기 위한 테스트용 데이터 위치
- 위 분리용 코드 이어서 작성
4-1) 학습용 코드
# 한개 이미지 가져와서 테스트
def test_OneImage(model, image_path):
    x = []
    img = cv2.imread(image_path, 0)

    cv2.imshow("current image", img)
    cv2.waitKey(0)

    tmp_x = cv2.resize(img, dsize = (84, 34))
    tmp_x = tmp_x.astype('int32')
    tmp_x = tmp_x.reshape(84, 34, 1)
    tmp_x = tmp_x / 255.0
    x.append(tmp_x)

    predicted_number = model.predict_classes(np.array(x))[0]

    return predicted_number

# 데이터셋 가져오기
def get_datasets(str_dataset_path):
    dataset_images = []
    dataset_labels = []

    for i in range(0, 10):
        for j in range(1, 100):
            img_name = str_dataset_path + "\\" + str(i) + "\\" + str(i) + " (" + str(j) + ").jpeg"
            try:
                img = cv2.imread(img_name, 0)

                x = cv2.resize(img, dsize = (84, 34))
                x = x.astype('int32')
                x = x.reshape(84, 34, 1)
                x = x / 255.0

                dataset_images.append(x)
                dataset_labels.append(i)

            except:
                None

    return dataset_images, dataset_labels

# CNN 모델
def model_CNN_ver1():
    # model
    model = models.Sequential()

    model.add(layers.Conv2D(32, (3, 3), activation='relu', input_shape=(84, 34, 1)))
    model.add(layers.MaxPooling2D((2, 2)))
    #model.add(layers.Dropout(0.5))

    model.add(layers.Conv2D(64, (3, 3), activation='relu'))
    model.add(layers.MaxPooling2D((2, 2)))
    model.add(layers.Dropout(0.5))

    # dense layer
    model.add(layers.Flatten())
    model.add(layers.Dense(32, activation='relu'))
    model.add(layers.Dense(10, activation='softmax'))

    model.compile(optimizer='adam',
              loss='sparse_categorical_crossentropy',
              metrics=['accuracy'])

    return model

# 데이터셋, 테스트셋 가져오기
train_images, train_labels = get_datasets(str_path_dataset)
test_images, test_labels = get_datasets(str_path_testset)

print("가져온 학습용 데이터 수 : ",  len(train_images))
print("가져온 테스트용 데이터 수 : ",  len(test_images))

# 모델 생성
model = model_CNN_ver1()

# 모델 8회 학습
model.fit(np.array(train_images), np.array(train_labels), epochs=8)
model.save("my_model.h5")

# h5 파일 가져와서 정확도 테스트
model22 = models.load_model("my_model.h5")

# 3회 정확도 테스트
test_loss, test_acc = model.evaluate(np.array(test_images),  np.array(test_labels), verbose=3)
print("학습된 모델의 정확도 : {:5.2f}%".format(100*test_acc))
4-2) 학습 결과
학습 결과 91.85%
- 대충 10번의 학습 후에 91.85%의 테스트 정확도를 가지는 my_model.h5 가중치, 모델 파일이 생성됨.
4-3) 가중치 파일 사용해서 정확도 테스트하기
test_images, test_labels = get_datasets(str_path_testset)
print("가져온 테스트용 데이터 수 : ",  len(test_images))

# 모델 생성
model = model_CNN_ver1()

# 파일을 불러오지 않고 모델의 정확도 테스트
test_loss, test_acc = model.evaluate(np.array(test_images),  np.array(test_labels), verbose=3)
print("학습안된 모델의 정확도 : {:5.2f}%".format(100*test_acc))

# h5 파일 가져온 뒤 정확도 테스트
model22 = models.load_model("my_model.h5")
test_loss, test_acc = model22.evaluate(np.array(test_images),  np.array(test_labels), verbose=3)
print("학습된 모델의 정확도 : {:5.2f}%".format(100*test_acc))
4-4) 테스트 결과
4-5) 이미지 한개씩 가져와서 예측된 값 보기
model22 = models.load_model("my_model.h5")

for i in range(0, 10):
    for j in range(1, 100):
        imgname = str_path_testset + "\\" + str(i) + "\\" + str(i) + " (" + str(j) + ").jpeg"
        try:
            print(test_OneImage(model22, imgname))
        except:
            print("no image files")
            None
4-6) 결과
- 중간 중간 잘못 예측된 결과가 보인다. 그냥 진행한다.
현재 이미지와 결과
5. 원본 이미지 넣어서 한번에 결과 보기
5-1) 테스트용 원본 이미지, 학습 파일 경로 지정
학습이 완료된 h5 파일과 테스트용 이미지가 보인다.
5-2) 코드
# Image_Separate 기반, 6조각으로 분리된 이미지 자체를 return
def Image_Separate_2(str_originImagePath):
    # init
    origin_w = 240 # 6*40
    origin_h = 120 # 6*20
    piece_x = int(origin_w/7)

    # Read Image
    img = cv2.imread(str_originImagePath, 0)
    img = cv2.resize(img, dsize=(origin_w, origin_h)).copy()
    img = img[int(origin_h*0.05):int(origin_h*0.75), int(origin_w*0.05):int(origin_w*0.90)].copy()

    # Separated Image
    list_img = []

    for i in range(0, 6):
        list_img.append(img[:, piece_x * i:piece_x * (i+1)])

    return list_img;

# 이미지를 받아서 예측 값 retrun
def test_OneImage_2(model, img):
    x = []

    tmp_x = cv2.resize(img, dsize = (84, 34))
    tmp_x = tmp_x.astype('int32')
    tmp_x = tmp_x.reshape(84, 34, 1)
    tmp_x = tmp_x / 255.0
    x.append(tmp_x)

    predicted_number = model.predict_classes(np.array(x))[0]

    return predicted_number

# 분리된 이미지 list를 하나씩 넣어서 결과값 list를 만듦
def completed_module(my_model, img_path):
    list_img_2 = Image_Separate_2(img_path)
    list_result = []

    for int_index in range(0, 6):
        list_result.append(test_OneImage_2(my_model, list_img_2[int_index]))

    return list_result;

def test_FullImage():
	oringin_img_path = "test (" + str(int_index) + ").jpeg"
    for int_index in range(1, 400):
        try:
        	# 결과 출력
            print(completed_module(model22, oringin_img_path)

            # 원본 이미지 보여주기
            origin_img = cv2.imread(oringin_img_path)
            cv2.imshow("result", origin_img)
            cv2.waitKey(0)
        except:
            None

# 테스트
test_FullImage()
5-3) 결과
- 체감상 70~80% 확률로 성공
결과
6. 학습된 가중치 파일 c#에서 실행하기
- HDF.Invoke, IronPython, Keras.Net, Tensorflow.Net 으로 코드 테스트해본 결과,
정상동작하지 않거나 라이브러리 종속성 문제, 파이썬 3 지원안함 등의 문제로 사용 제한됨
-> 현재사용하는 python39버전과 PythonNet Nuget의 버전을 맞춰서 설치함
- 위에서 작성된 코드를 클래스 형태로 재작성
- 파이썬 코드와 h5 모듈은 실행되는 파일과 동일폴더에 위치하여야 함
(VS의 속성 창에서 해당 파일 우클릭 > 속성 > 파일복사 칸의 값을 항상 복사로 설정하면
실행 시마다 해당 파일이 실행 파일 옆에 복사됨)
- 이 과정은 C#-Python 연동을 위한 테스트 코드 부분임
Activity 제작 관련 내용은 아래 7번 항목으로 이동
6-1) C# 코드 (PythonNet)
nuget package manager에서 버전에 맞게 설치
using System;
using System.Text;
using System.IO;
using Python.Runtime; // PythonNet - python39버전 설치
using System.Collections.Generic;

namespace ConsoleApp2
{
    class Program
    {
        static void Main(string[] args)
        {
            // 엔진 초기화
            PythonEngine.Initialize();

	    // 정확하진 않지만 자원을 동결시켜 준다고함
            using (Py.GIL())
            {
            	// Import할 모듈명, HwanCaptchaModule.py
                dynamic hcm = Py.Import("HwanCaptchaModule");
                // 임포트한 모듈 내부의 Hwan_Captcha_Module 클래스 초기화
                dynamic f = hcm.Hwan_Captcha_Module("cur.jpeg", "my_model.h5");

                // 클래스 내의 start 메소드 실행 후 결과 출력
                Console.WriteLine(f.start());
            }
            // 엔진 종료
            PythonEngine.Shutdown();

            Console.WriteLine("Press any key...");
            Console.ReadKey();
        }
    }
}
6-2) Python 코드
# -*- coding: utf-8 -*-
import os
# 로그 레벨 설정으로 Tensorflow 경고 문구 제거, Tensorflow를 import하기 전에 변경해 줘야한다.
os.environ['TF_CPP_MIN_LOG_LEVEL'] = '2'

import sys
import cv2
import numpy as np
from tensorflow.keras import models

# Input : str_ImagePath, str_modelPath
# Output : str_result
class Hwan_Captcha_Module(object):
    def __init__(self, str_ImagePath, str_modelPath):
        self.str_ImagePath = str_ImagePath
        self.str_modelPath = str_modelPath
        self.model = models.load_model(self.str_modelPath)

    def Image_Classification(self, img):
    	# 신경망에 넣기 전 데이터 형태 가공
        x = []
        tmp_x = cv2.resize(img, dsize = (84, 34)).astype('int32').reshape(84, 34, 1) / 255.0
        x.append(tmp_x)

        # predict로 반환된 SoftMax 값들을 리스트 형태로 바꾸어 그 중 가장 높은 확률의 인덱스를 구함
        list = self.model.predict(np.array(x)).tolist()[0][:]
        list = list.index(max(list))

        # 찾아낸 인덱스가 신경망이 판단한 현재 이미지와 가장 가까운 숫자임
        return list

    def completed_module(self):
    	origin_w = 240 # 6*40
        origin_h = 120 # 6*20
        piece_x = int(origin_w/7)

	    # 흑백 이미지로 로드(이미지의 차원을 줄임)
        img = cv2.imread(self.str_ImagePath, 0)
        img = cv2.resize(img, dsize=(origin_w, origin_h))
        # 주변 공백 제거
        img = img[int(origin_h*0.05):int(origin_h*0.75), int(origin_w*0.05):int(origin_w*0.90)]

        str_result = ""
        # 위에서 계산된 한 조각 크기만큼 옆으로 이동하면서 숫자 이미지를 가져옴.
        for i in range(0, 6):
            str_result += str(self.Image_Classification(img[:, piece_x * i:piece_x * (i+1)]))

        return str_result;

	# 찾아낸 결과를 return 하고 에러 발생 시 문자열 return
    def start(self):
        try:
            return self.completed_module()
        except:
            return "파일을 찾을 수 없습니다."

if __name__ == "__main__":
    Hwan_Captcha_Module(sys.argv[1], sys.argv[2]).start()
6-3) 결과
- 한글자씩 틀리는 경우가 종종 있지만 대부분 성공 (체감상 60~70% 성공률인 듯 하다)
- 아래 411050은 마지막이 0인지 9인지 사람이 봐도 헷갈림
7. Custom Activity 제작
- Nuget Package Manager.exe 또는 Nuget.exe를 활용하여 .nupkg 파일 생성
- python 코드의 종속성을 없애기 위해 6번의 코드를 one directory - exe 형태로 만든 뒤 nupkg에 포함시킴
(auto-exe-to-py 환경 구성 및 사용법)
- nuspec 파일로 패키지 구성을 정의할 수 있음 (자세한 내용은 MSDN 참조)
7-1) C# 코드 (C# 클래스 라이브러리, .Net Framework 4.6.1)
using System;
using System.IO;
using System.Collections.Generic;
using System.Linq;
using System.Text;
using System.Threading.Tasks;
using System.Activities;
using System.ComponentModel;
using System.Diagnostics;

namespace ClassLibrary
{
    public class Captcha : CodeActivity
    {
        [Category("Input")]
        [RequiredArgument]
        public InArgument<String> in_str_imagepath { get; set; }

        [Category("Output")]
        public OutArgument<String> out_str_result { get; set; }

        protected override void Execute(CodeActivityContext context)
        {
            var str_imagepath = in_str_imagepath.Get(context);
            var str_result = "";
            var str_error = "";
            var str_id = "activities_captcha";
            var str_version = "1.0.7";

            var psi = new ProcessStartInfo();

            var str_h5file = Environment.GetEnvironmentVariable("userprofile") + "\\.nuget\\packages\\"+ str_id + "\\"+ str_version + "\\hcm\\model.h5";
            psi.FileName = Environment.GetEnvironmentVariable("userprofile") + "\\.nuget\\packages\\" + str_id + "\\" + str_version + "\\hcm\\Hwan_Captcha_Module.exe";

            psi.Arguments = string.Format("{0} {1}", str_imagepath, str_h5file);

            psi.UseShellExecute = false;
            psi.RedirectStandardOutput = true;
            psi.RedirectStandardError = true;

            using (var process = Process.Start(psi))
            {
                str_error = process.StandardError.ReadToEnd();
                str_result = process.StandardOutput.ReadToEnd();

                // 에러가 비어있지 않으면 에러 출력
                if (!string.IsNullOrEmpty(str_error))
                {
                    Console.WriteLine("error : " + str_error);
                }
            }

            out_str_result.Set(context, str_result);
        }
    }
}
7-2) .nuspec 파일 생성
<?xml version="1.0" encoding="utf-8"?>
<package >
  <metadata>
    <id>activities_captcha</id>
    <version>1.0.7</version>
    <title>캡챠!</title>
    <authors>hwan</authors>
    <requireLicenseAcceptance>false</requireLicenseAcceptance>
    <license type="expression">MIT</license>
    <description>개꿀</description>
    <releaseNotes>Summary of changes made in this release of the package.</releaseNotes>
    <tags>Captcha</tags>
  </metadata>
  <files>
    <file src="Hwan_Captcha_Module\**" target="hcm\" />
  </files>
</package>
7-3) nuget.exe로 .nupkg 파일 생성하기
- nuget 파일 알아서 구하고 c:\windows 안에 두기
- nuspec있는 프로젝트 위치로 이동 후 아래 코드 실행
nuget pack
7-4) 생성된 .nupkg 파일을 특정 폴더(custom-package 배포용 폴더)에 위치시킨뒤 UiPath Stuido 에서 가져옴
from pykrx import stock

# 원하는 조건의 티커 목록 얻어오기, market 설정 안해줄 경우 기본은 KOSPI
# 아래 조건은 2021년 6월 1일 기준의 KOSDAQ 상장사들의 티커를 받아옴
tickers = stock.get_market_ticker_list("2021-06-01", market="KOSDAQ") #yyyy-MM-dd

# 각 티커들의 종목이름을 확인
for ticker in tickers:
	str_종목이름 = stock.get_market_ticker_name(ticker)

    # 시작일~종료일 사이 특정 티커의 OHLCV 정보를 한달 단위로 받아옴 (DateFrame)
    df = stock.get_market_ohlcv_by_date("20210101", "20210601", ticker, "m")
	print(df.head(6))
# -*- coding: utf-8 -*-
import sys
import pygame
import math
from pygame.locals import *

PI = 3.14159265359
R = 200
screenX = 410
screenY = 410
Ox = screenX / 2
Oy = screenY / 2

# 초당 프레임수를 정의
TARGET_FPS = 30
clock = pygame.time.Clock()

# 색 정의
BLACK = (0, 0, 0)
RED = (255, 0, 0)
GREEN = (0, 255, 0)
BLUE = (0, 0, 255)
WHITE = (255, 255, 255)

# 실수를 더하기 위해서 만들어줌
def myrange(start, end, step):
    r = start
    while(r<end):
        yield r
        r += step

# 인원 수 를 입력받아서 같은 각도로 나눠줌
def auto_line(size):
  a = 360.0 / size # 1명 각도
  # cnt = 0
  tmp = 0 # 각도 누적
  x = 0.0
  y = 0.0

  for tmp in myrange(0, 360, a):
      # cnt = cnt + 1

      # 간단한 수학 공식으로 좌표 Get
      x = R * math.cos(math.radians(tmp))
      y = R * math.sin(math.radians(tmp))

      #print "[%d] tmp : %.2lf, x : %lf, y : %lf" %(cnt, tmp, x, y)
      pygame.draw.line(screen, BLACK, (Ox, Oy), (Ox+x, Oy+y), 2)


# 라이브러리 및 디스플레이 초기화
pygame.init()

num = raw_input("num : ")
screen = pygame.display.set_mode((screenX, screenY), DOUBLEBUF)
pygame.display.set_caption('Hello World!')  # 타이틀바의 텍스트를 설정

screen.fill(WHITE)
#pygame.draw.line(screen, RED, (Ox, Oy-R*10), (Ox, Oy+R*10), 1) # y
#pygame.draw.line(screen, RED, (Ox-R*10, Oy), (Ox+R*10, Oy), 1) # x

# 메인 루프
while True:
  for event in pygame.event.get():
    # 이벤트를 처리하는 부분
    if event.type == QUIT:
      pygame.quit()
      sys.exit()

  auto_line(int(num)) # 입력받은 인원 수로 원을 나눠줌
  pygame.draw.circle(screen, BLACK, (Ox, Oy), R, 2) # 외부 원
  pygame.draw.circle(screen, BLACK, (Ox, Oy), 20) # 중심 원
  pygame.display.flip()  # 화면 전체를 업데이트
  clock.tick(TARGET_FPS)  # 프레임 수 맞추기
#-*- coding: utf-8 -*-
import sys
import pygame
from pygame.locals import *
import time

# 초당 프레임수를 정의
TARGET_FPS = 30
clock = pygame.time.Clock()

# 색 정의
BLACK = (0, 0, 0)
RED = (255, 0, 0)
GREEN = (0, 255, 0)
BLUE = (0, 0, 255)
WHITE = (255, 255, 255)

# 라이브러리 및 디스플레이 초기화
pygame.init()
screen = pygame.display.set_mode((600, 400), DOUBLEBUF) # 윈도우 크기 및 속성 설정
pygame.display.set_caption('돌림판')  # 타이틀바의 텍스트를 설정

# 이미지 파일을 로딩
img = pygame.image.load('images.png') # 돌림판 이미지
img2 = pygame.image.load('images2.jpg') # 화살표

degree = 0
flag = True
rad = 100
stop_time = 3 # 돌림판이 멈출 때까지의 시간 (클수록 빨리 멈춤)

# 메인 루프
while True:
  for event in pygame.event.get():
    # 이벤트를 처리하는 부분
    if event.type == QUIT:
      pygame.quit()
      sys.exit()

    # 키보드 이벤트 처리
    if event.type == KEYDOWN:
      # 스페이스 -> 토글
      if event.key == 32:
          if flag == True:
              flag = False
          elif flag == False:
              flag = True
              rad = 100

  # 게임의 상태를 화면에 그려주는 부분
  screen.fill(WHITE)

  # 이미지 파일 회전하여 그리기
  x = 350
  y = 200

  rotated = pygame.transform.rotate(img, degree) # degree 만큼 회전
  rect = rotated.get_rect()
  rect.center = (x, y)
  screen.blit(rotated, rect)

  # 플래그의 상태가 True면 회전, False면 천천히 정지
  if flag == True:
      degree += rad
  elif flag == False:
      if rad > 0:
          rad -= stop_time
          degree += rad


  screen.blit(img2, (70, 180)) # 화살표 그리기
  pygame.display.flip()  # 화면 전체를 업데이트
  clock.tick(TARGET_FPS)  # 프레임 수 맞추기